
How To Build A B-Series AWD Honda Civic
Posted by Matthew Marks on 12th Nov 2024
If you have owned a turbo or high-horsepower FWD Honda, you will feel the pain of just spinning down the road. Don't get me wrong, they do sound awesome, but as the old saying goes, spinning isn't winning!
I'm Matt, the owner and founder of Exoracing, specialising in performance aftermarket parts since 2018, and I have built myself 2 AWD B-Series in the past, including the one we are going to reference.
Today, we will help you on your way to building a full AWD conversion setup for your Honda Civic! We will review the OEM and aftermarket parts you need, the different brands that make the various parts, and everything in between.
For this article, I'm going to reference our own AWD Honda Civic EK B-Series build, but the parts are very similar to an EP3 or DC5; you will need to use MK2 CRV parts rather than the B-Series MK1 CRV parts as a base.
You can check out our build, where we went from FWD to AWD in around 24 hours. The video is below. Whilst you're there, please subscribe to our YouTube channel for more car build progress! We will do weekly videos on the build and try to show every step of the way (including the failures).
For this guide, we will go from the front of the car to the back, starting with the gearbox and ending with the differential and driveshafts, and explain why we used each part.
Doing it this way, you can easily go back and reference the exact part you need; just make sure to bookmark this page!
Let's start with all the OEM parts you need for your build.
OEM Honda CR-V MK1 Parts
As we are UK-based, we will use the Honda CR-V MK1 as a base for all the parts here. The reason we use a MK1 CR-V is that the CR-V was one of the only Honda AWD cars from the factory, and being a B-Series, the gearbox shares the same bolt pattern as the engine.
Because of this, you can literally bolt it to the engine and have an AWD gearbox setup without having to do a crazy amount of work for the gearset/transfer case, etc.
There are multiple reasons why it's a bad idea to bolt it on and go though, as we will go into further on in the guide. The transmission parts are easy to access, and you can pick up the running gear very cheaply. We found ours a few years back on the Facebook Marketplace for around £400, which was a bargain!
I would look out for the whole car breaking as a starting point, and even better if the car has already been stripped down and is ready to go.
If the Honda Wagovan were more readily available in the UK, we would buy it, as according to American sources, it tends to take more power stock than its CR-V counterpart. We will also use some Freelander parts here, as they will take more power (such as the prop shaft) and are the best off-the-shelf viscous couplers.
So this is the list of OEM parts you will need to grab from a MK1 CR-V and/or Freelander:
- SBXM B20 Gearbox
- Transfer Case
- CRV Shifter Cables and Bracket
- CRV Shifter
- CRV Propshaft
- Freelander Propshaft and Viscous Coupler
- CRV Rear Differential
- CRV Rear Driveshafts
- Civic Rear Callipers, Brake Pads and Discs
Optional
- S9B Gearset
- Honda CR-V rear trailing arms (if you want to use the 5x114.3)
Gearbox Build
Now that you have gathered all the parts, you can use the stock CRV gearset or a longer-ratio OEM option such as the S9B, the longest-geared B-Series gearbox from the factory (that I know of).
Considering we were around 500 whp (and I'm assuming you are also turbocharged if you're reading this), we decided the CR-V gears were too short and wanted to hold the gears for as long as possible for power delivery, so we combined S9B and SBXM gearset parts.
If you are looking for an S9B gearbox, you will need to find a Honda Civic MB6 breaking; again, we found ours on Facebook marketplace, cheap for around the £400 mark, as the shorter geared gearboxes, such as the S80, are more popular (and more expensive) for naturally aspirated applications.
This is due to being able to get to the end of the gear faster, and up to a certain point, would be better. We want the gears to be as long as possible, as with a manual, the last thing you want to do is bang through 4 gears and only reach 30mph (haha)!
Also, the CRV's 1st-2nd gear selector fork is incredibly weak, but luckily, we can fix that later! The CRV differential is also an open diff, so we added a wavetrac AWD differential into the gearbox and a Speedfactory FWD2AWD conversion kit to allow us to easily install the S9B FWD gearset into the AWD gearbox.
The video below shows our gearbox build, where we install both gearsets together and assemble the gearbox from scratch.
So lets run through all of the parts we used in the gearbox build, including the gearsets:
- OEM SXBM Gearset and housing
- OEM S9B Gearset
- Speedfactory FWD2AWD B-Series gear conversion kit
- Wavetrac BAWD LSD
- Synchrotech B-Series carbon synchro set
- Speedfactory BAWD detent springs
Now, let's move on to how we use each part in combination with the others. The CR-V gear set was never designed for high horsepower or RPM.
With a vast gear spread between 1st and 2nd and the stock rev limiter of around 6700rpm, you will get a much better drive and feel from an S9B gearset retrofitted to the BAWD gearbox. This is where the S9B gearset and the Speedfactory FWD2AWD kit come in.
Speedfactory has developed a billet shifter fork and shim kit that allows you to use the 1-4 gears from the S9B to achieve the longest possible ratios and remove the weak 1st-2nd shifter selector fork.
This kit doesn't require machining, making it an excellent option for a quick retrofit of this gearset. However, it requires the Input shaft, hubs, sliders, and synchros from the FWD gearbox, while the countershaft and ring gear must be from the AWD gearbox.
Then, you remove all the gears from both stacks and rebuild them using the 1st-4th gears from the FWD gearset and the 5th gear from the AWD gearset.
There is also an option to use this FWD2AWD kit for a PPG gear set, but this was more than we needed for 500whp.
As for the differential, the stock CRV gearbox comes with an open Differential, so we decided to go with the Wavetrac BAWD LSD. At the time, this was one of two options, the second being an H22 LSD, which you need to machine and shim, but we opted for a full, bolt-in option.
We did find a forum post many years ago from someone who modified a H22 differential to work, but we weren't experienced enough to do it ourselves, so we opted for the simpler bolt-in option.
Don't worry if this sounds daunting; the Speedfactory kit will include instructions on how to do all of this and where to place the shims, and, if needed, reference our gearbox build above.
AWD Engine Mounts
The next item on the list is to get upgraded engine mounts. As we discussed earlier, there are very limited factory options for BAWD cars, so for this step, you HAVE to go with either custom mounts or aftermarket off-the-shelf mounts. We opted for aftermarket mounts because we already knew Hasport manufactured them, and they were virtually plug-and-play.
If you're already turbocharged (which I'm assuming you are), you will know that when you come on to boost and let off, the engine will rock more than the factory engine mounts can handle, and it can often split.
This is where you generally upgrade to an aftermarket engine mount kit, such as Hasport, to give you stiffer engine mounts and prevent the engine from rocking back and forth.

If you build an AWD, you will need specific AWD engine mounts, as the CR-V's gearbox and rear subframe mounting positions differ from the OEM mounts.
We went with Hasport BAWD 70a urethane engine mounts for our build, but the most significant parts here are the gearbox bracket and rear bracket, as they allow you to mount the gearbox and set it in the correct position for the transfer case, etc.
The gearbox mount differs slightly from its FWD counterpart, so you must choose a specific AWD mount set to ensure everything fits.
Ensure you get the correct AWD engine mounts for your chassis and subframe. This shouldn't cause you any problems. The fitment was incredibly tight on ours on the rear engine mount and bracket, but everything did align correctly!
There are quite a few options popping up now, like subframe swaps, so even if you have an EG subframe in an EK chassis, there should be an engine mount kit out there for you.
Shifter And Cables
You could take two paths with the shifter and cables, and they both depend on your budget. The first option would be to use all the CRV OEM parts, which would line up and be directly bolted into place.
There are a few disadvantages here, though, with the main one being the age of the parts. The older these parts become, the more worn they are, and the more it is worth going with a brand-new aftermarket option.
At this point in time, the CR-V is around 30 years old, so the cables are almost guaranteed to be stretched, and the shifters will have play in them, which isn't what you want in a brand-new performance AWD swap.
Note: You might be wondering why we are talking about shifter cables and not a shifter linkage. Well, the AWD gearbox comes with factory-installed shifter cables, not a linkage like the usual B-Series Honda engine. Because of this, we need to convert to a cable-operated shift, which is relatively easy; it just requires a few more parts and a hole in the firewall to route the cables.
Short Shifter
We decided on our build to go with an aftermarket short shifter to get the most out of the AWD system and make the build feel more fun.
So we chose a Hybrid Racing Honda Accord CL7 shifter and matching base plate, as most aftermarket B-Series shifter cables, such as the K-Tuned cables we opted for, are designed specifically for the Honda Accord CL7 shifter.

To mount this shifter, we had to modify the tunnel, though. Since the Civic EJ9 we bought was originally an automatic, we flattened the hole above where the shifter sits, drilled some holes, and attached the base plate with the supplied hardware. The shifter then bolts to the top of this for a clean look without any wind noise or fumes going through the exhaust tunnel.
Shifter Cables And Firewall Bung
Now that we have sorted the short shifter, it's time to move to the shifter cables. At the time, the only option was the K-Tuned BAWD shifter cables, which come with a bracket that bolts to the gearbox and allows the cables to sit at the perfect angle.
All you need to do to install this part is to remove the OEM shifter cable bracket and bolt the new one in. K-Tuned are even nice enough to include the correct spacers in the kit to allow the cables to sit at the perfect height.
Since we bought all of our AWD parts, Hybrid Racing has now released a BAWD shifter cable kit, but we have yet to swap over as the K-Tuned version has not caused us any problems (other than our own stupidity fitting them haha!)

We could have also gone with the OEM CRV shifter cable option, but the cables we initially had were too stretched, so we decided against it. Plus, the aftermarket cables generally have replaceable spherical ends, which is a bonus and gives a better feel than the OEM rubber bushes, especially at 30 years old.
It's like buying an old sofa from 1980 and not cleaning it or replacing the broken leg you just don't do it.
Now that we have chosen the shifter cables, we must decide how to pass them through the bulkhead to connect to the shifter. There are two options here, and in the past, we have taken both routes in separate cars. It mainly depends on what you're doing with the heater box.
In our original build, we removed the heater, as the plan was always to go with something aftermarket, such as the T7Design 400w fully electric heater. In this case, we could use the original hole where the heater passed through the bulkhead.

In this build, we decided to retain the OEM heater for the time being, so we drilled a hole in the firewall on the passenger side to the correct size of the K-tuned shifter cable grommet. This allowed us to use the rubber and remove the chance of the shifter cable rubbing against the metal.
Now that the shifter side is all sorted and you have chosen your shifter, cables, and transmission bracket, we can move on to the AWD system.
Note: For anyone thinking of using the Hybrid Racing no-cut shifter, although technically it could work if you could swap the shifter ends of the cables to B-Series, it would cause massive interference with either the propshaft or/and/or exhaust. For this reason, we would highly advise against it, but thought it was worth mentioning if you're in a squeeze.
Transfer Case
For the transfer case, we have decided to go with the stock MK1 CR-V transfer case for the time being, but as we run more power, the case or gears are more likely to break. As they are hypoid gears, they tend to push themselves apart under high horsepower and just shatter the case.
After doing a load of research online, we have seen many cars running them stock at crazy power, but as soon as it lets go, it generally destroys the hypoid gears inside it and causes carnage. We are risking it currently, but if we ever break it, we will upgrade to a billet one in the future.
I guess the main thing to point out here is that the stock transfer case was only ever designed for around 160bhp, and to rev to 6700RPM, which is around 3-4x less power than we are currently running in ours.
There are a couple of options here, such as the Speedfactory billet B-Series AWD transfer case, a complete like-for-like replacement that will house OEM or aftermarket gears when correctly shimmed.

For the transfer gears themselves, there are options out there now for upgraded hypoid gears, which are much stronger, but we won't delve too deeply down that rabbit hole in this guide, as this is more to help you build your first AWD system.
For anyone considering upgrading to hypoid gears and running really high power, PPG would be a good starting point!
Prop Shaft
You will now need to decide which propshaft you will use. In our case, we wanted to use the viscous coupler from a Freelander to allow the power to gradually transfer and reduce the risk of snapping anything in the drivetrain.
How this works is that when the front wheels are gripping, the power isn't being transferred to the rear wheels. As soon as the fronts start slipping, the viscous fluid heats up and becomes more solid, in turn transferring power to the rear.
Because of this, we aren't always locked in AWD mode, which is good news for wear and tear and transmission loss while driving. Effectively, it only uses 4WD when needed.
Because of this, we opted to get a custom propshaft made. We used the ends of the CRV prop shaft to match the bolt pattern on the transfer case and rear differential, and mated this to the Freelander prop shaft.

We also upgraded all of the U-joints, as they are also prone to breaking. A great option is to go with 1310 U-joints, regarded as one of the best ways to easily upgrade your prop and take outstanding power.
As a very easy, off-the-shelf option, S1Built now manufactures the 1310 u-joints, so you can buy them and bolt them on directly!

As mentioned earlier, we decided to use the factory freelander option for the viscous coupler. Still, there are now options for brand-new versions, such as the S1Built viscous, a great bolt-on option with brand-new carrier bearings.
As our viscous coupler and carrier bearings were in perfect condition, we had no need to replace them. Still, upgrading has an advantage, such as the ability to choose the fluid viscosity in the viscous coupler, which affects how quickly power is transferred from the time the wheels start spinning.
When building your first AWD Civic, the OEM one should be fine, unless you are going for crazy power right out of the box and want to control the exact slip for 60ft times.
There is an exact science to this, but we have never delved that deep into it as we aren't trying to break records, we just wanted to have a road going AWD Civic which is fun and grips as much as possible.
Viscous Coupler Mounting
Depending on which viscous coupler you choose, you have a few options for mounting it. For an off-the-shelf option, you can use the Innovative viscous coupler mounting brackets, which are a great option, or make up your own custom plates, as we did.

We used thick 4mm steel and welded a cross-section to allow the carrier bearings to be mounted. We also slotted them slightly in case we had to adjust the angle of the prop shaft in the future.
The choice between these options is up to you, depending on whether you feel confident fabricating or prefer a bolt-on option.
There are many paths you can take here with the custom route; just pick the one you are most confident in.
Note: If you are drag racing, there are situations where you may need to run a separate propshaft hoop to protect you and the car if anything happens to the prop. If you are going to race the car, now might be the time to consider whether you need one for regulatory purposes.
Rear Differential
We opted to use the stock CRV differential and housing for the rear differential, as we knew this would match everything else ratio wise in the setup, and we would not have to work out gear ratios, etc.
We are now running a viscous in the system, though, so we did not need the clutch packs in the rear differential as the viscous fluid engages power transfer, not the clutch packs. In the stock system, the prop shaft runs to the rear, and the fluid in the rear differential engages the clutch packs to create drive to the rear wheels.

The viscous coupler now controls the power to the rear, not the clutch packs, so we no longer need these. Plus, the fluid will generally boil when you run more power than stock, so from a longevity and grip standpoint, eliminating them also made more sense.
As a result, we removed the clutch plates and installed S1-Built locking plates in the rear differential. These plates make it much easier than the conventional method of pinning and welding the clutch packs. You just replace the clutch plates with the locking plates, and you are good to go! 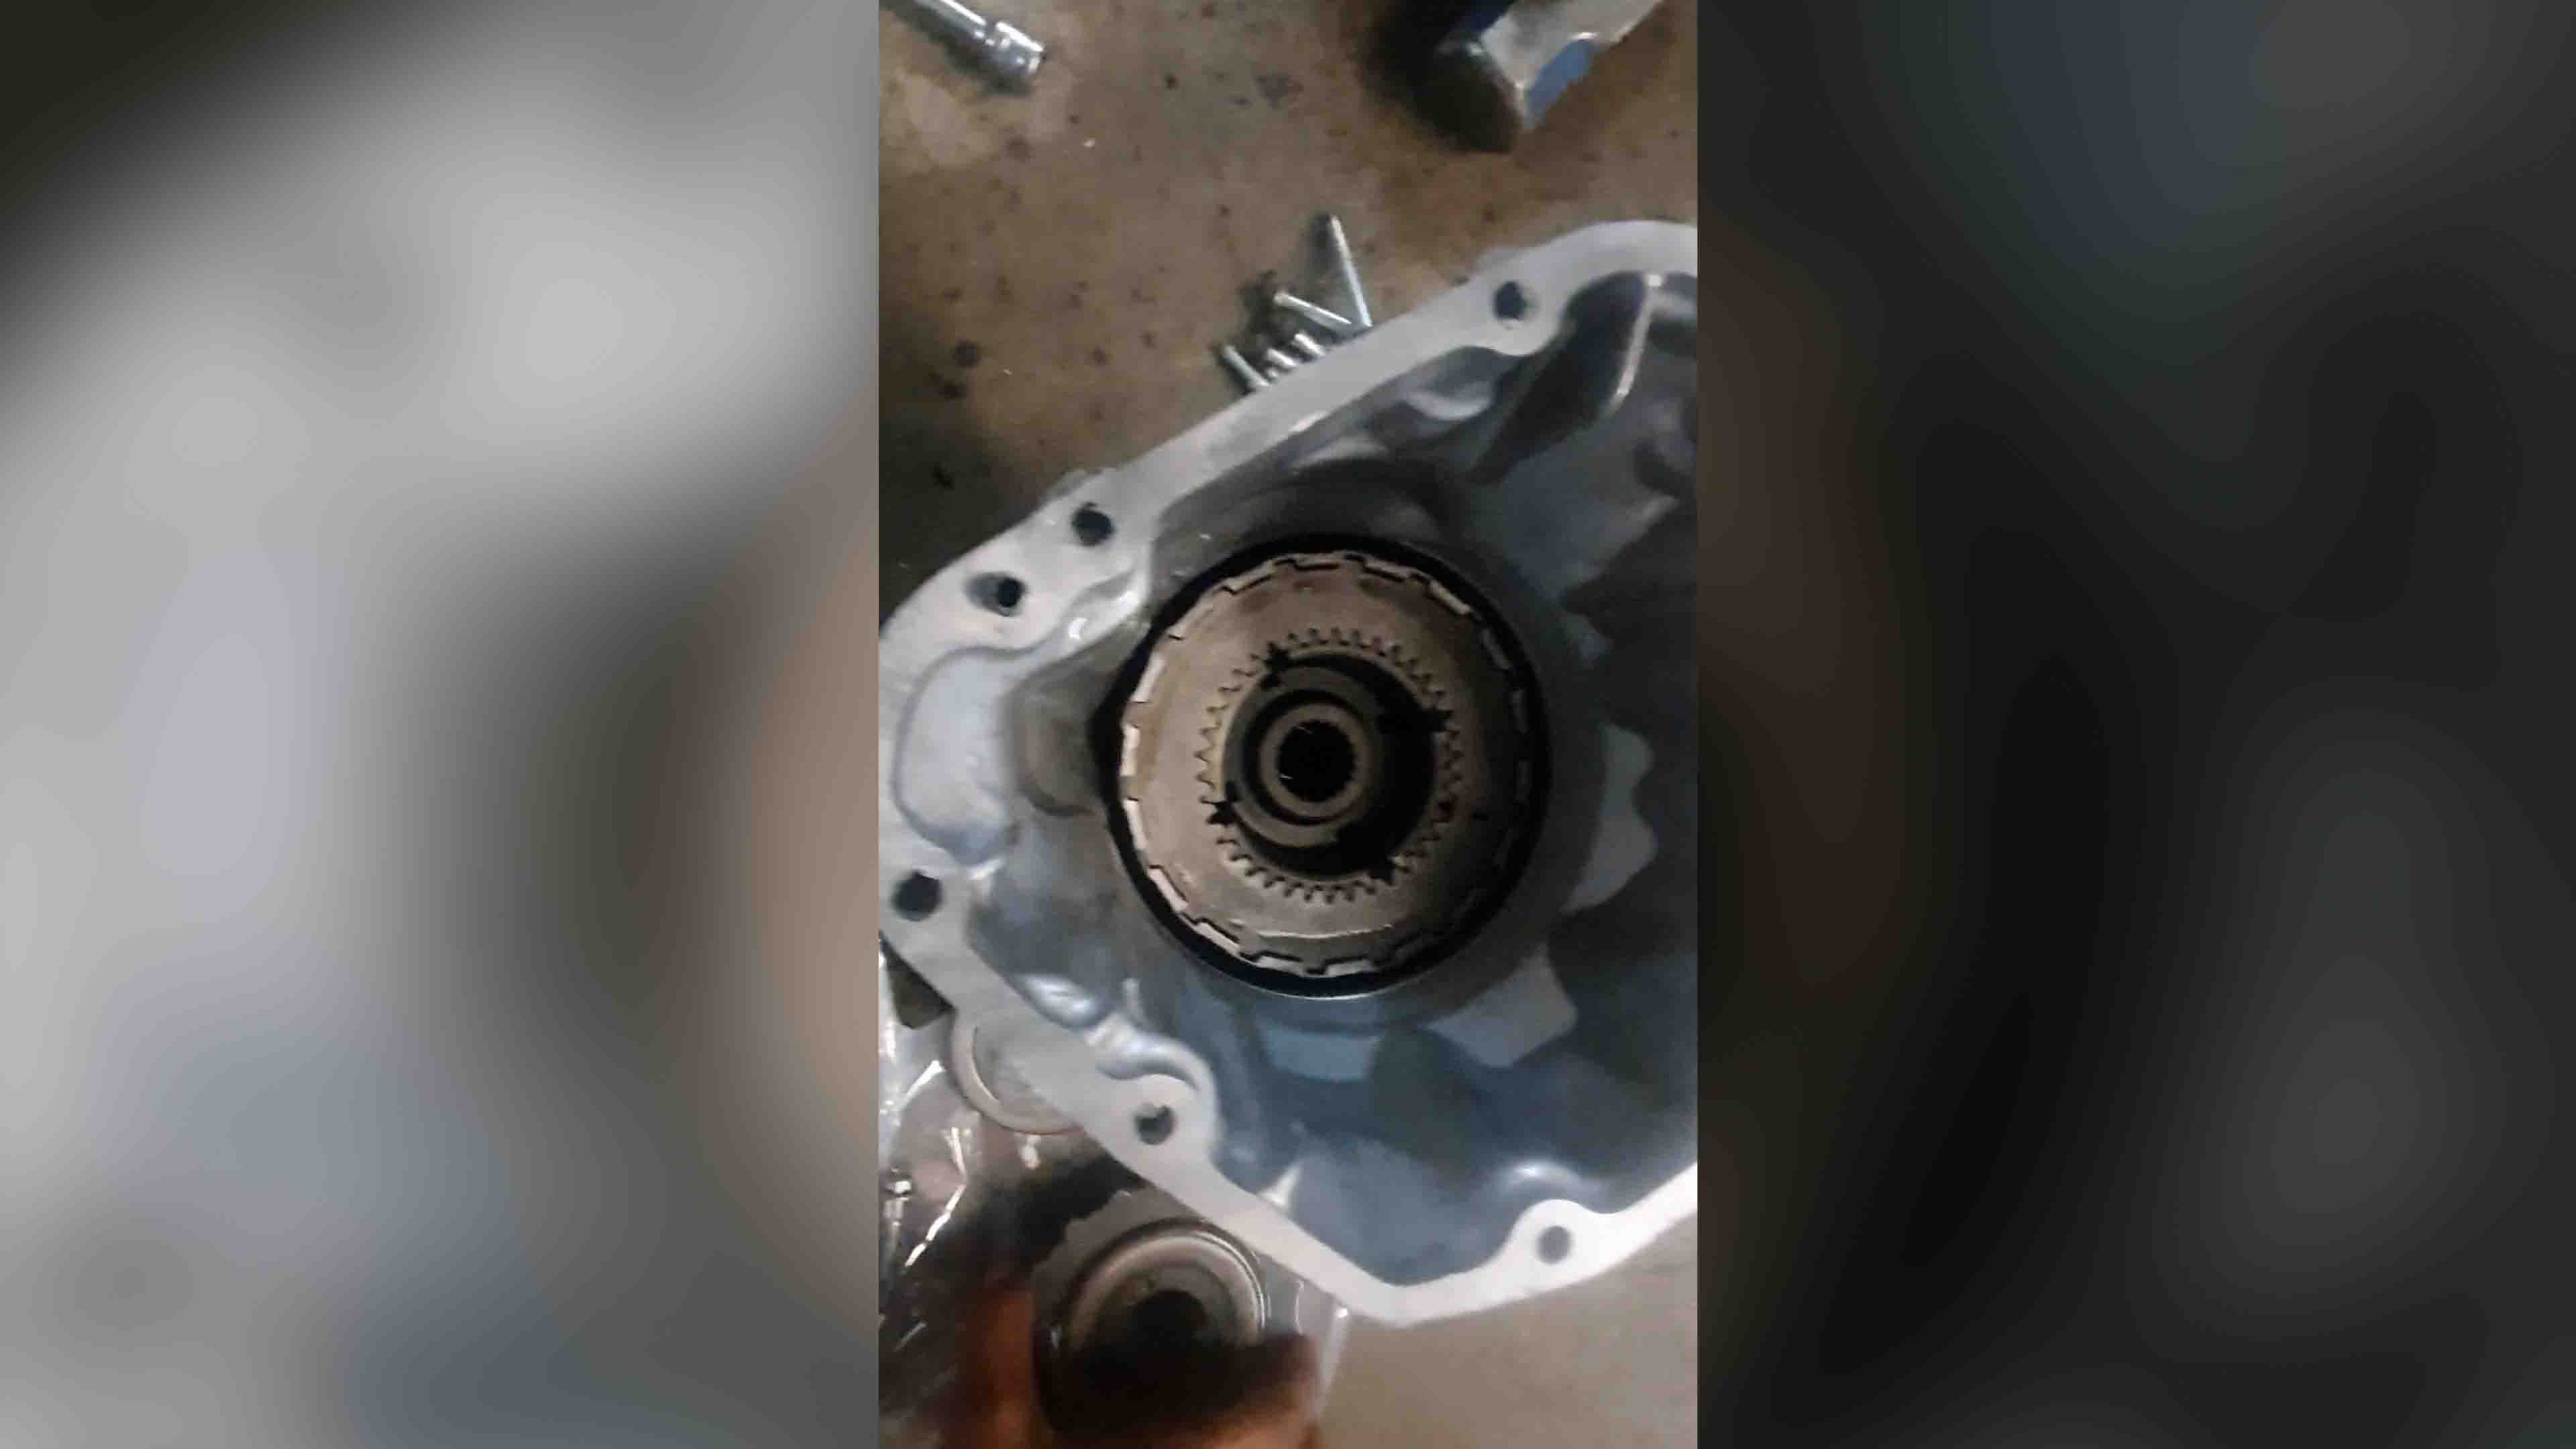
If you wanted permanent AWD, you could remove the viscous coupler from the system, and every wheel would constantly be a driving wheel. However, you risk binding, so it is much safer to combine the viscous and the locking plates.
Note: S1Built now make a full locking plate block rather than multiple plates, which is much more solid. We would recommend using this instead of the individual plates as it's much easier to remove/install, and the added strength is always a bonus.
Rear Differential Brace
Before we go any further, as a quick note, you will have to remove the OEM fuel tank to make room for the rear diff. We will explore aftermarket fuel cells later in this guide.
It might also be worth removing the OEM fuel lines. Although you can use these, you would have to convert them to whichever fuel tank you're using, and at that point, you're better off just removing them and opting for something more versatile, such as AN fittings and hose.
Also, you can decide where to route them and are not stuck to the OEM Honda design.
Now, we need to decide how to mount the rear differential.
As we are using a Honda Civic EK as our base, we had multiple options, including Innovative, S1Built, and Hubcityperformance.

At the time, we went with the most accessible option, the Innovative AWD rear differential mount. Everything has been designed to make it very easy to bolt up the rear differential and to ensure it sits at the perfect angle.
We did have to modify the chassis a bit, though, to make everything work. First, we couldn't mount the rear differential without notching the subframe, so we cut a section out of that, folded the tabs up, and welded it back up.
Without doing this, the back of the differential housing would have nowhere to sit, and you could not physically get it to sit underneath.

Once done, you must weld plates on either side of the brace to get a solid mount to the chassis. Innovative includes a Rivnut kit to allow you to do this without welding, but we went for the welding option as it seemed a bit more permanent and more substantial.
It is an option to rivnut it, and you won't need to weld anything, but after talking it over with a few of our guys, we weren't happy about having the entire rear setup hanging on 4-6 bolts rivnutted into the chassis. It just didn't seem like it would be anywhere near strong enough, so we decided to weld it, as a much more permanent option.
Lastly, you may have to hammer up the boot floor slightly to make the diff fit correctly in line with the brace and prop shaft. You only need a very slight amount, but it is always worth doing, as the prop/diff will have to sit at the perfect angle to not cause any problems.
The prop angle is one of the most important things in this entire process, and will ensure the CV Joints never bind or cause problems, so it's always worth taking your time here to work out the propshaft angle, even if you're hammering the chassis up millimetre by millimetre.
Rear Trailing Arms
Now we move on to the rear trailing arms, which are incredibly important as this is how you will connect everything in the system to add drive to the rear wheels.
There are a couple of options here, and it would mostly depend on the stud pattern you are going for or how much you want to spend. So, for our build, we opted to go with the DIY S1Built kit, which includes the gusset plate that needs welding in and a hub adapter to fit our bolt pattern and accept the driveshafts.
At the time of writing, this is still the cheapest option, but it is not a direct bolt-on. You need to cut a hole for the hub adapters and weld in the rear gusset plates. As it needs a bit more work, this isn't beginner-friendly, but it would be the most cost-effective.
At the time we were already thousands deep into the project and couldn't justify the extra money on the full arms. Plus, we knew that Phil at XDR Motors and everyone else helping with the build were more than confident in their ability to modify anything we needed.

If you do want a more bolt-on option, S1Built now offer stainless steel rear trailing arms that replace your OEM trailing arms. These are direct bolt-ons with no modification needed and also come with trailing arm bushes, etc.
If you're looking for the easiest and fastest way to get up and running, this is by far the best option. Yes you will pay more but there is less to go wrong, and can bolt them up in ten minutes.
They are also available in multiple stud patterns such as 4x100, 4x114.3 and 5x114.3, so you can match the wheels you already have or the stud pattern at the front of the car to make wheel choice that little bit easier.
Both options here will work; it depends on whether you prefer to save some money and weld the parts or spend more and get a full bolt-on option.

In terms of callipers, they are designed to bolt on OEM callipers, so whether it's a 242mm or 262mm rear setup, as long as the discs have the correct PCD to the trailing arms you have chosen, you can fit them like a stock setup.
One last thing to note is that you will also need to match handbrake cables to a rear disc setup, but you may already have this if you convert from a setup that already utilises rear discs.
We originally had drums on the rear of the EJ9, so we had to source OEM handbrake cables and make it work with the Nissin 242mm rear callipers.
Rear Shock Brackets
The rear shock brackets are the next part you will need before fitting the driveshafts. These brackets fit between the suspension strut/coilover and the rear lower control arm, moving the shock either forward or backwards slightly to allow room for the driveshaft. 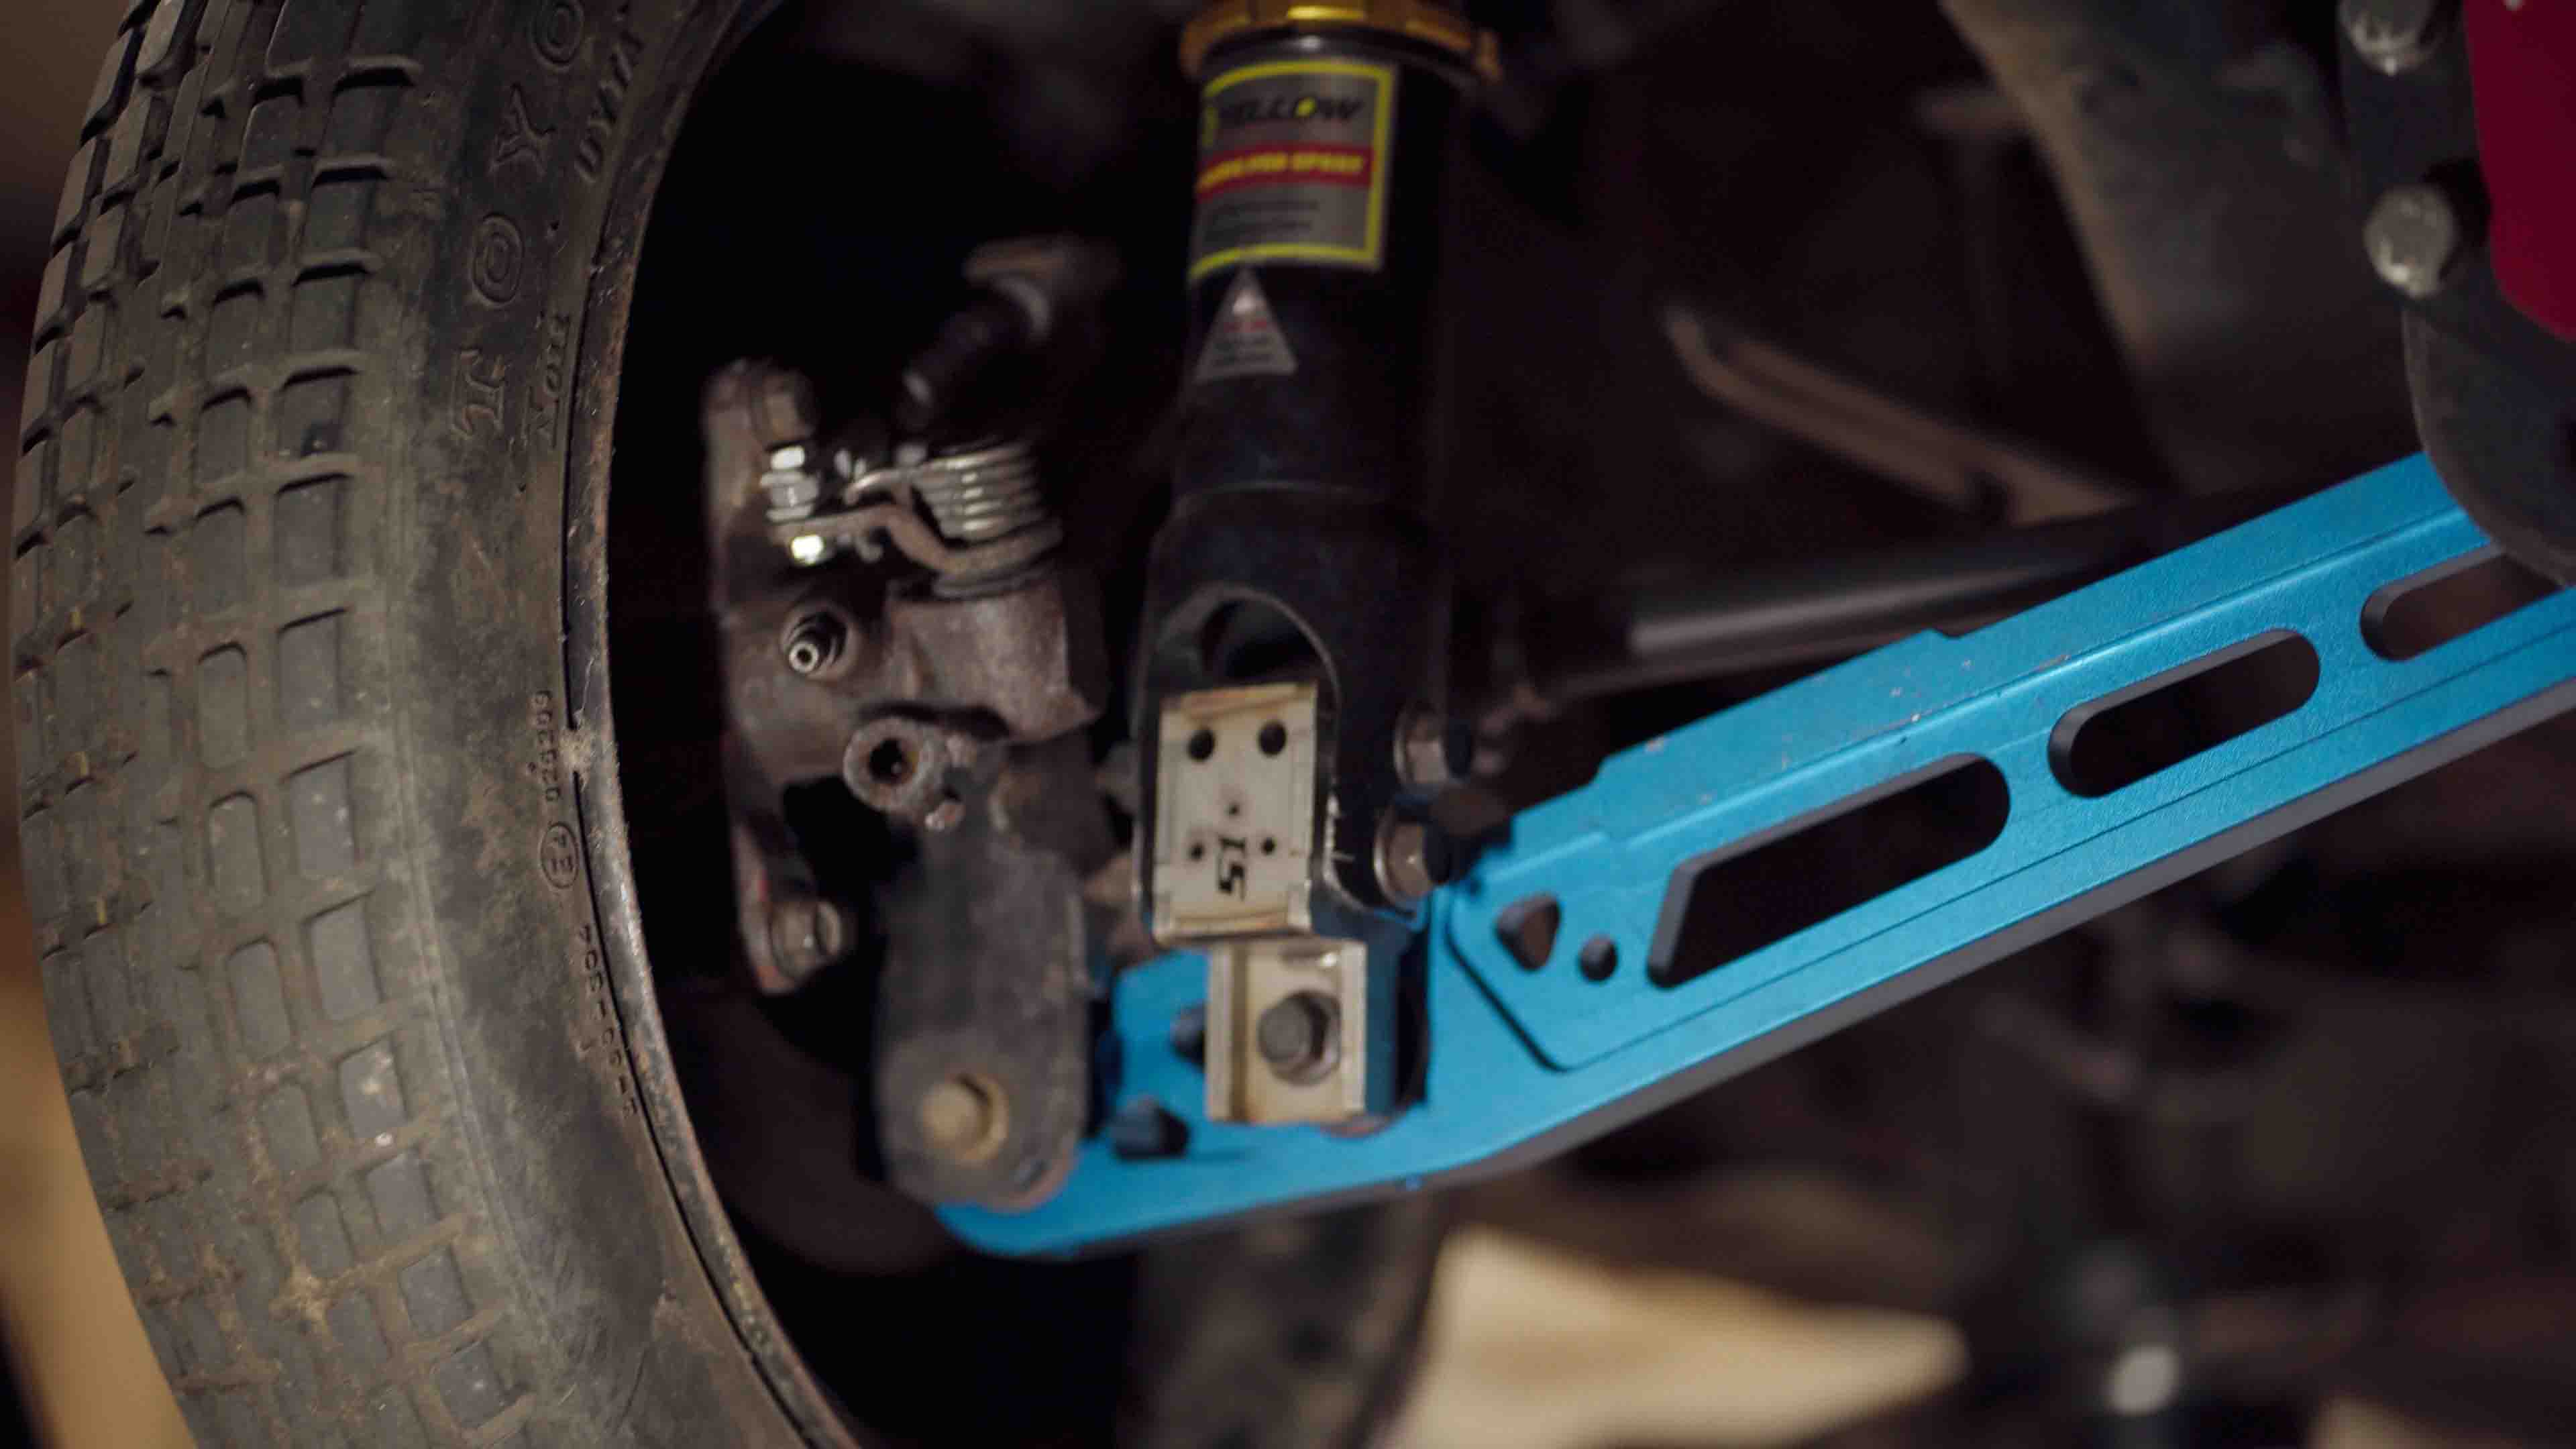
If you do not use these brackets, the driveshaft will rub the suspension because the hub is misaligned with the rear trailing arm (when driveshafts are involved).
These are incredibly simple to install: remove the shock and insert the shock bracket.
There are two options. The first is the stainless steel box section S1Built shock bracket, which we opted for, or the second option, they now offer a revised billet version. Instead of the coilover fork sitting over the shock bracket, the new revised design replaces it and slides over the bottom of the coilover.

The only note about this second option is that you would need coilovers with a removable bottom sleeve, as you have to remove it to make this option work.
Now that you have nearly all the parts you need, the last item on the running gear list is the rear driveshafts!
Rear Driveshafts
Now that you have mounted the rear diff, we can move on to the driveshafts. For the front, you can use any B-Series driveshafts, provided you are using the correct hubs to match the spline. On the rear, it would depend on which trailing arms you have chosen from the section above.
If you went with the S1Built example, they will accept any CRV/Wagon 23-splined rear driveshaft. Since we were using all CRV parts, we ended up using 2 short CRV driveshafts. From the factory, the CRV rear differential is mounted slightly off-centre, making one driveshaft longer than the other.
As the rear diff mounting kit locates the diff in the centre, the only way we could make it work correctly was to use 2 of the short driveshafts. We found this out the hard way, but luckily we hadn't bought the rear shafts at this point as we were just mocking up.
We ended up going to insane shafts in the end, and so far, so good. We actually bought four of these, as one of our customers was doing the same swap at the time. After installing everything, you should now have a fully working AWD system!
There is nothing tricky with the rear driveshafts; they are installed as any other driveshaft would be.
Fuel Cell And Lines
Now, we need to get the car running, and the first thing on the list is a fuel cell. As mentioned earlier, you have removed the stock fuel tank and lines to make room for the rear differential, but we still need to find a fuel cell and make up lines.
There are three good options here, again, all money-dependent. The first is to go with something like a Nuke Performance fuel cell, which you can mount in the boot. As they have an inbuilt CFC swirl pot unit, you can mount the pumps in the tank, which makes for a much neater install. 
The second option is to go with a cheaper fuel cell, external swirl pot, and external fuel pumps (which we opted for in the first build). I'll add the video below here in case you want to learn how to build this entire system from scratch.
The last option is to go with a specifically made fuel cell that fits underneath the car, such as a custom-fabricated option or the FCS fuel cell, which fits neatly under the car and eliminates the need to mount anything in the boot.
Once you have chosen the type of cell you need, you need to make up AN lines or some fuel line to feed and return from the fuel rail. If you need help making AN lines, we have a guide here that goes through all of this in depth.
If you prefer to build the system yourself, we have a video below of the external fuel cell and swirl pot setup from our last AWD build, along with another showing you how to put everything together.
Exhaust
The last item on the list before you can start driving the car is the exhaust system. If you've already researched this system, the exhaust is likely the most challenging. It will have to be fully custom, as you have now taken up the whole tunnel, which the exhaust would usually run down with a prop shaft and viscous coupler.
So, there are a few options here. You can either run everything out of the bonnet/side exit, which is acceptable in drag applications (or area, depending on local law). In the UK, we cannot run the exhaust out of the bonnet due to the regulations surrounding this and the need for a catalytic converter.

If your application is solely drag racing, then you don't have a huge issue here. Cut a hole in the bonnet and send it (haha!).
But for road use, it's a bit trickier.
We did actually find a great video which outlines the entire exhaust system from front to back, and this is the route we are going to go with our build (currently in progress) where you run the exhaust down as usually just past the anti-roll bar, then cross over to the passenger side, and oval the tube to be able to fit down the little gap in the chassis (this is why we also moved the brakes lines to the other side).
Update: Since writing this, we have now finished our AWD exhaust system, and made it exactly as we explained. Watch the video below:
From here, you can add silencers or anything else you need to add before exiting at the back.
There are a few things to note here. Firstly, on the passenger side of the chassis, you will encounter brake lines. To counter this, we had Hel Performance come down and measure up some custom lines, which we can move to the opposite side of the car, so we don't boil the brake fluid.

The next thing to consider is that if you went with the fuel cell mounted under here or were thinking of running fuel lines here, you would either need to move it to the opposite side or figure out where you can physically run everything.
The main thing here would be to forward-plan the brake and fuel lines to ensure this doesn't become a problem, so hopefully, you have read down here before starting to order or fit anything!
Once the full exhaust is all made up and ready to go, you can finally start the car and watch that all-important first turn of all four wheels!
Note: One thing we found massively helpful here were to run V-Band clamps. Although we have always run them on our own cars, it was even more important here as we knew we would have to keep removing and fitting parts from the system, and considering an Uppipe for when we take it drag racing. If you want your own V-Bands, we'll add the 3" V-Band product below!
Conclusion
So now you should know everything you need to build your first B-Series AWD Honda Civic! Although there are many variables to account for, I have tried to cover everything I can think of.
If you think I've missed anything or need help with any of the steps or parts here, please let us know, and we can add or amend it to help more people in the future. The more in-depth the guide is, the greater our chance is of helping someone else build their first one.
Alternatively, if this has helped you, please let us know or tag us in your videos on social media, as we would love to see them! @exoracinguk
Thank you all for reading, and if you would like to check out any of our other related articles, which may also be helpful, I'll link them here: