
Turbo Blanket vs Blowtorch: Thermal Camera Data
Posted by Matthew Marks on 31st Dec 2025
![]()
What happens if you hit an Exoracing turbo blanket with a blowtorch for three minutes straight? We will test it today, and the thermal imaging camera will indicate whether they are worth using or not.
Over time, a turbocharger’s extreme heat can make your engine bay a heat-damage risk. The problem is not just how hot the turbo itself gets, it is how much of that heat radiates into everything nearby.
This is precisely why turbo blankets exist: to contain the heat inside the turbo housing and shield the rest of your engine bay from that radiant heat.
I’m Matt, owner of Exoracing. We supply heat-management parts daily for turbocharged street cars, track builds, and high-power setups.
We’ve seen what works and what doesn't, and as many people are sceptical about turbo blankets or think the temperature-reduction claims are hype, we thought it was time to run a fully data-driven test.
We want to go beyond marketing and show real evidence and data.
By the end of this guide, you’ll have a precise test method and hard data from a thermal imaging camera.
We will demonstrate two things: how well our turbo blanket withstands direct flame exposure, and how much it reduces temperature on the protected side. In other words, you will see with your own eyes the difference a high-quality turbo blanket makes in heat retention.
Here is the plan:
- First, we break down the blanket construction and why each layer is crucial
- Next, we explain our blowtorch test setup and how we plan to test it
- Then, we present timed thermal readings over several intervals to show how the temperatures evolve
- Finally, we interpret the results in plain terms, so you know what it means for your engine bay
Just a quick note before we start. This test is designed to clearly show two things: how the blanket materials handle a direct flame and how much the temperature drops from the inside to the outside surface over time.
It is a controlled bench setup, so the measurements stay consistent and easy to compare. After this, we will run a separate test on a turbo in an engine bay and log multiple data points the same way.
- We test our Exoracing turbo blanket with a direct propane torch and record temperatures using a thermal imaging camera.
- The goal is to demonstrate material durability under extreme heat and to measure the actual temperature reduction on the outside of the blanket.
- We logged temperatures at multiple time intervals, from a few seconds up to three minutes, so you can see how heat transfer changes over time.
- The results show how well the blanket withstands direct flame without igniting or failing, and how much it reduces heat transfer to the other side.
Why Turbo Blankets Matter in the Real World
A turbocharger produces extreme heat during boost. Exhaust gas temperatures can reach incredibly high levels inside the turbine housing, and the outside of the turbo can become hot enough to cause heat soak of surrounding components.
That heat does not remain contained; it will radiate into the engine bay, soaking nearby components such as wiring, plastic parts, intake pipes, or all of the above.
Over time, this leads to brittle hoses, cooked sensors, heat-stressed wiring insulation, higher intake temperatures, and wear on components near the turbo.
In short, turbo heat is not just annoying; it can cause real damage and performance inconsistency if left unchecked.
A turbo blanket is designed to do two jobs at once.
- Contain heat within the turbine housing to reduce heat seeping into the engine bay. The turbo stays hot, while the rest of the bay stays cooler.
- Protect components, including oil, coolant, wiring, brake, bonnet, and intake pipework, from radiant heat.
What most people miss is how quickly radiant heat builds up over time.
Metal parts heat up, then they start heating other parts, and the air under the bonnet becomes hotter as well. That is heat soak in a nushell. A turbo blanket reduces heat loss from the source, thereby slowing heat transfer.
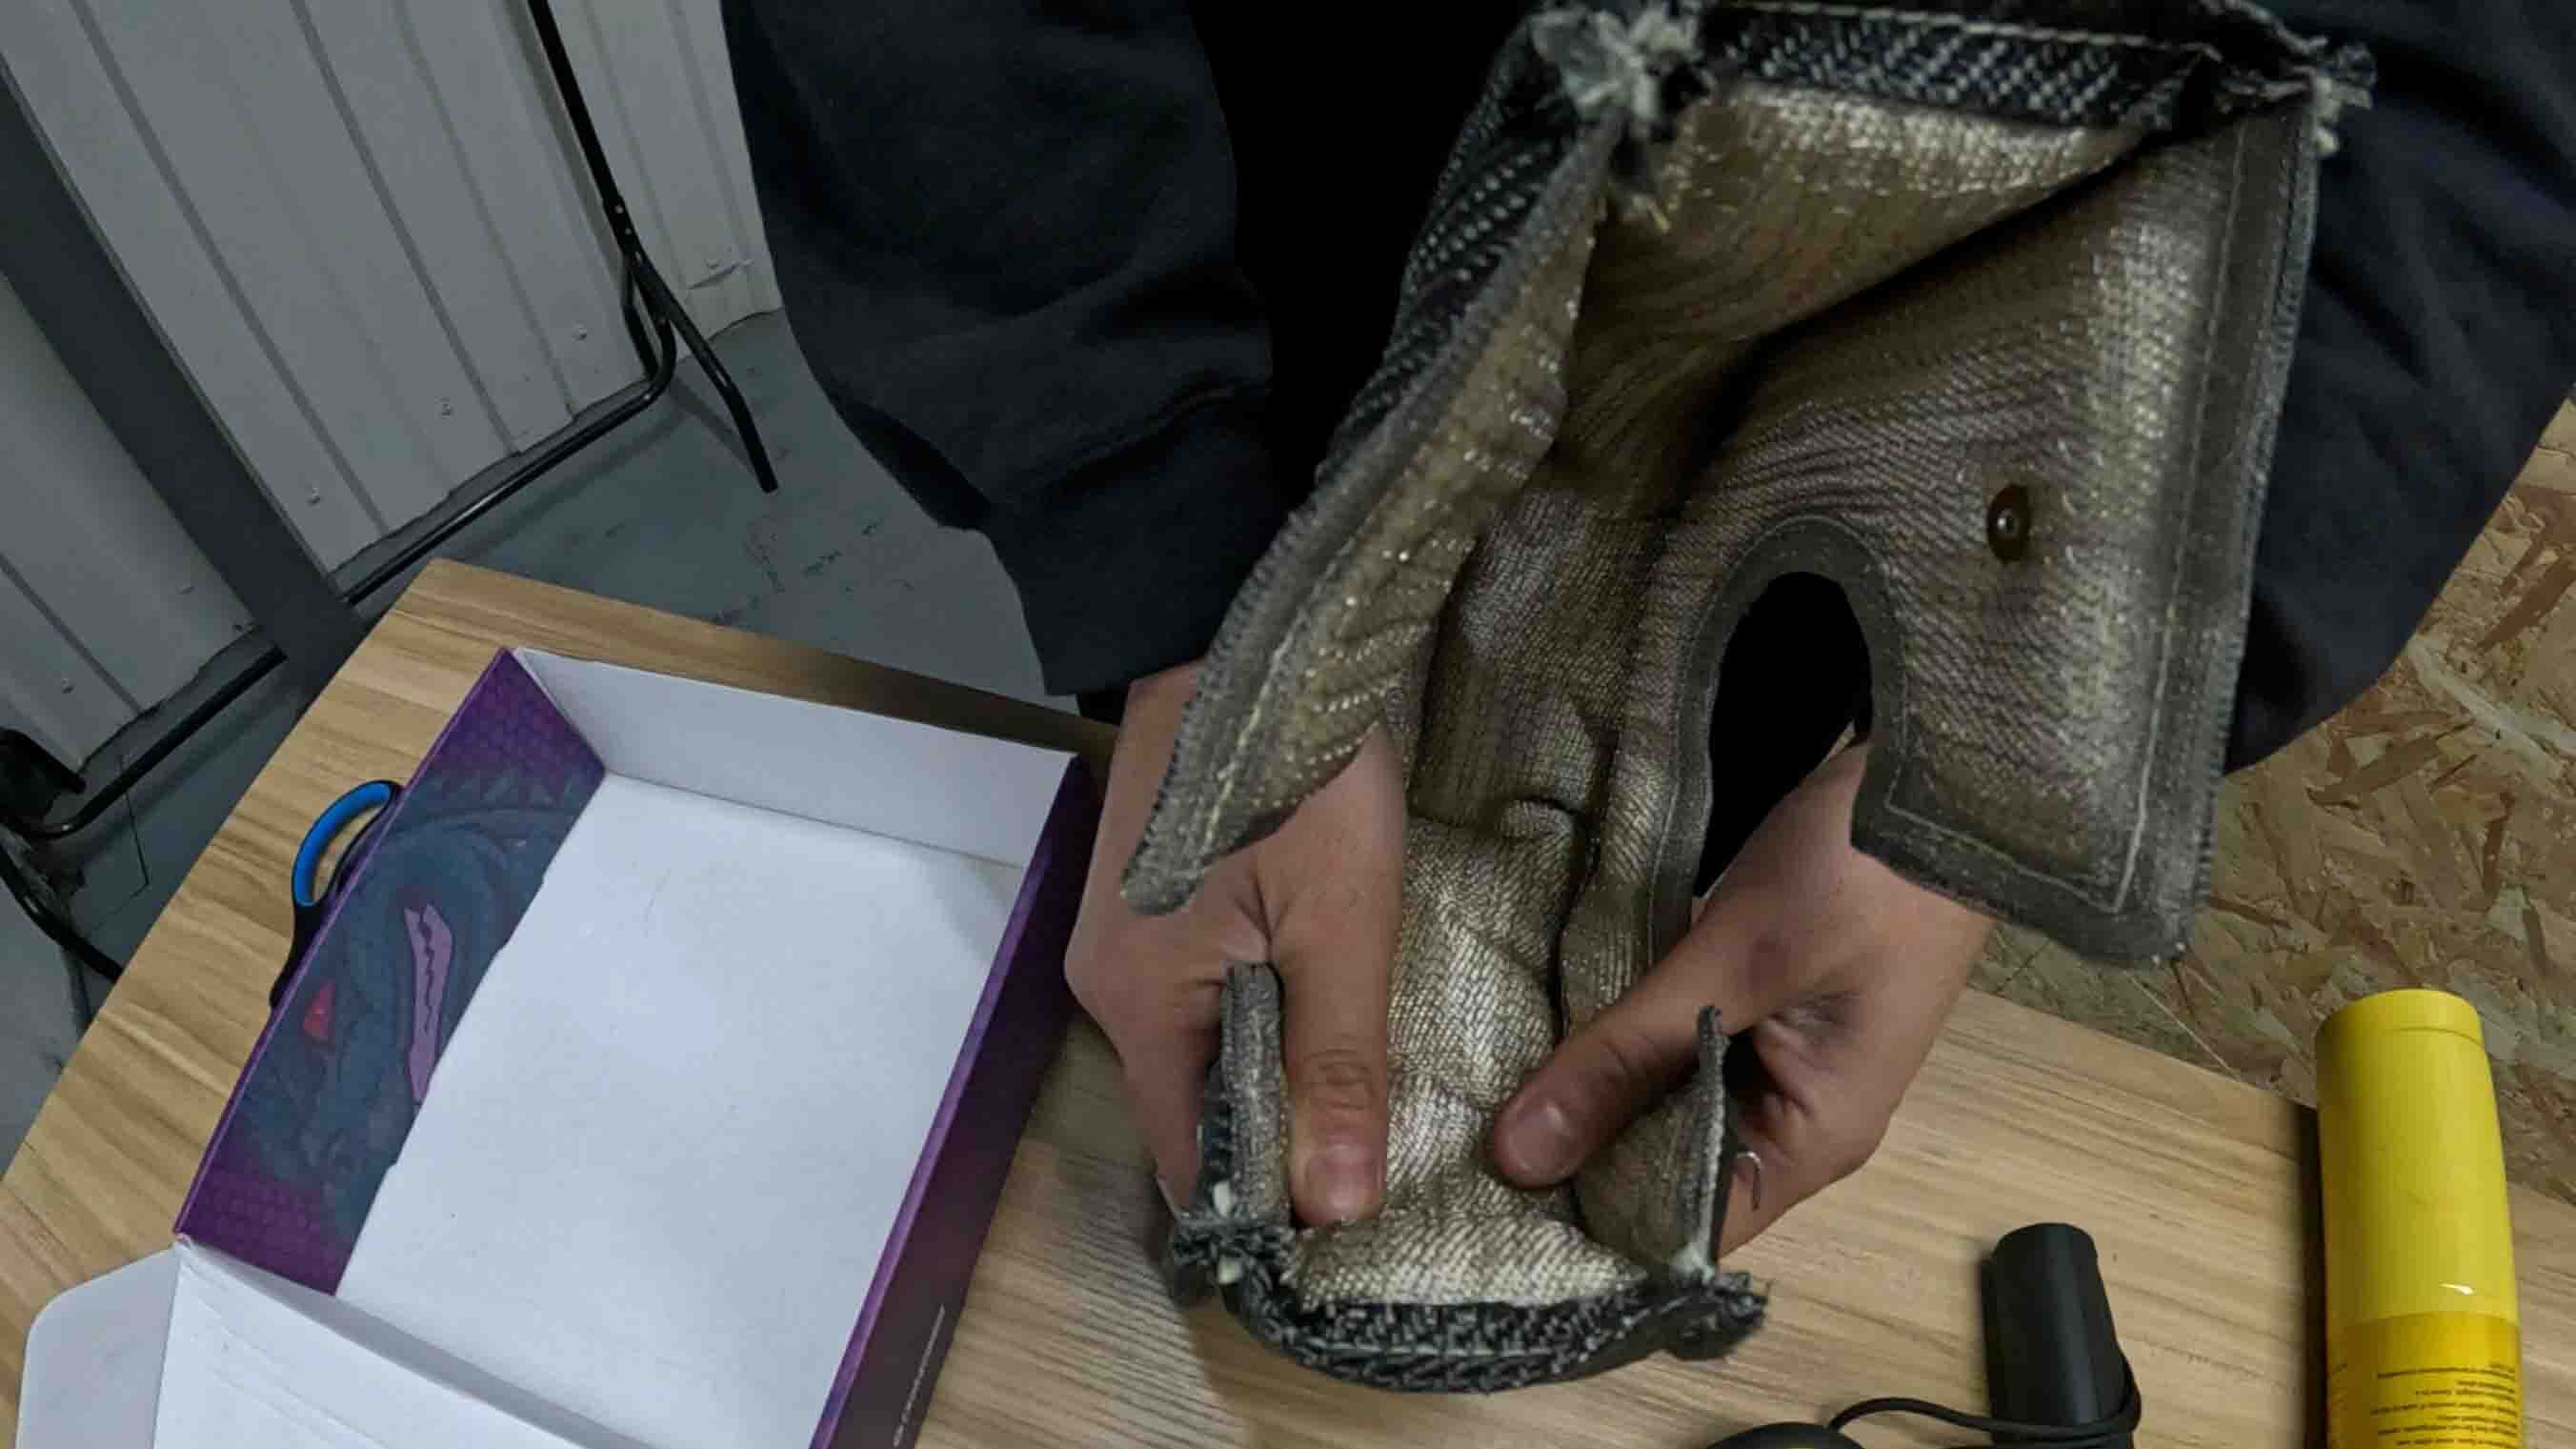
Our Turbo Blanket Construction: Why Each Layer Exists
If you plan to use a turbo blanket, you want to know precisely why each layer exists and how it is assembled. We have a layered construction, where each layer serves a specific purpose to withstand extreme heat. In basic terms, the material choice matters.
Let's break down the different layers and why each one is used. We are going to start from the inside out and run through why each part exists.
Stainless steel wire mesh
On the side facing the turbo housing, we use stainless steel mesh. It protects the insulation from direct contact and abrasion over time, it helps to spread heat across the surface to reduce localised hotspots, and adds structure so the turbo blanket holds up under harsh conditions.
We also run a very thin layer of stainless steel around the outer edges of the turbo blanket to ensure everything remains intact and doesn't move or split over time.
Silica insulation wool core
Inside the blanket is a thick layer of silica insulation wool. This is the primary heat barrier that slows heat transfer. The simple way to think about it is this: it is the main layer that resists heat moving from the inside to the outside of the blanket.
This is the magic part of the blanket and the component designed to reduce heat transfer as much as possible.
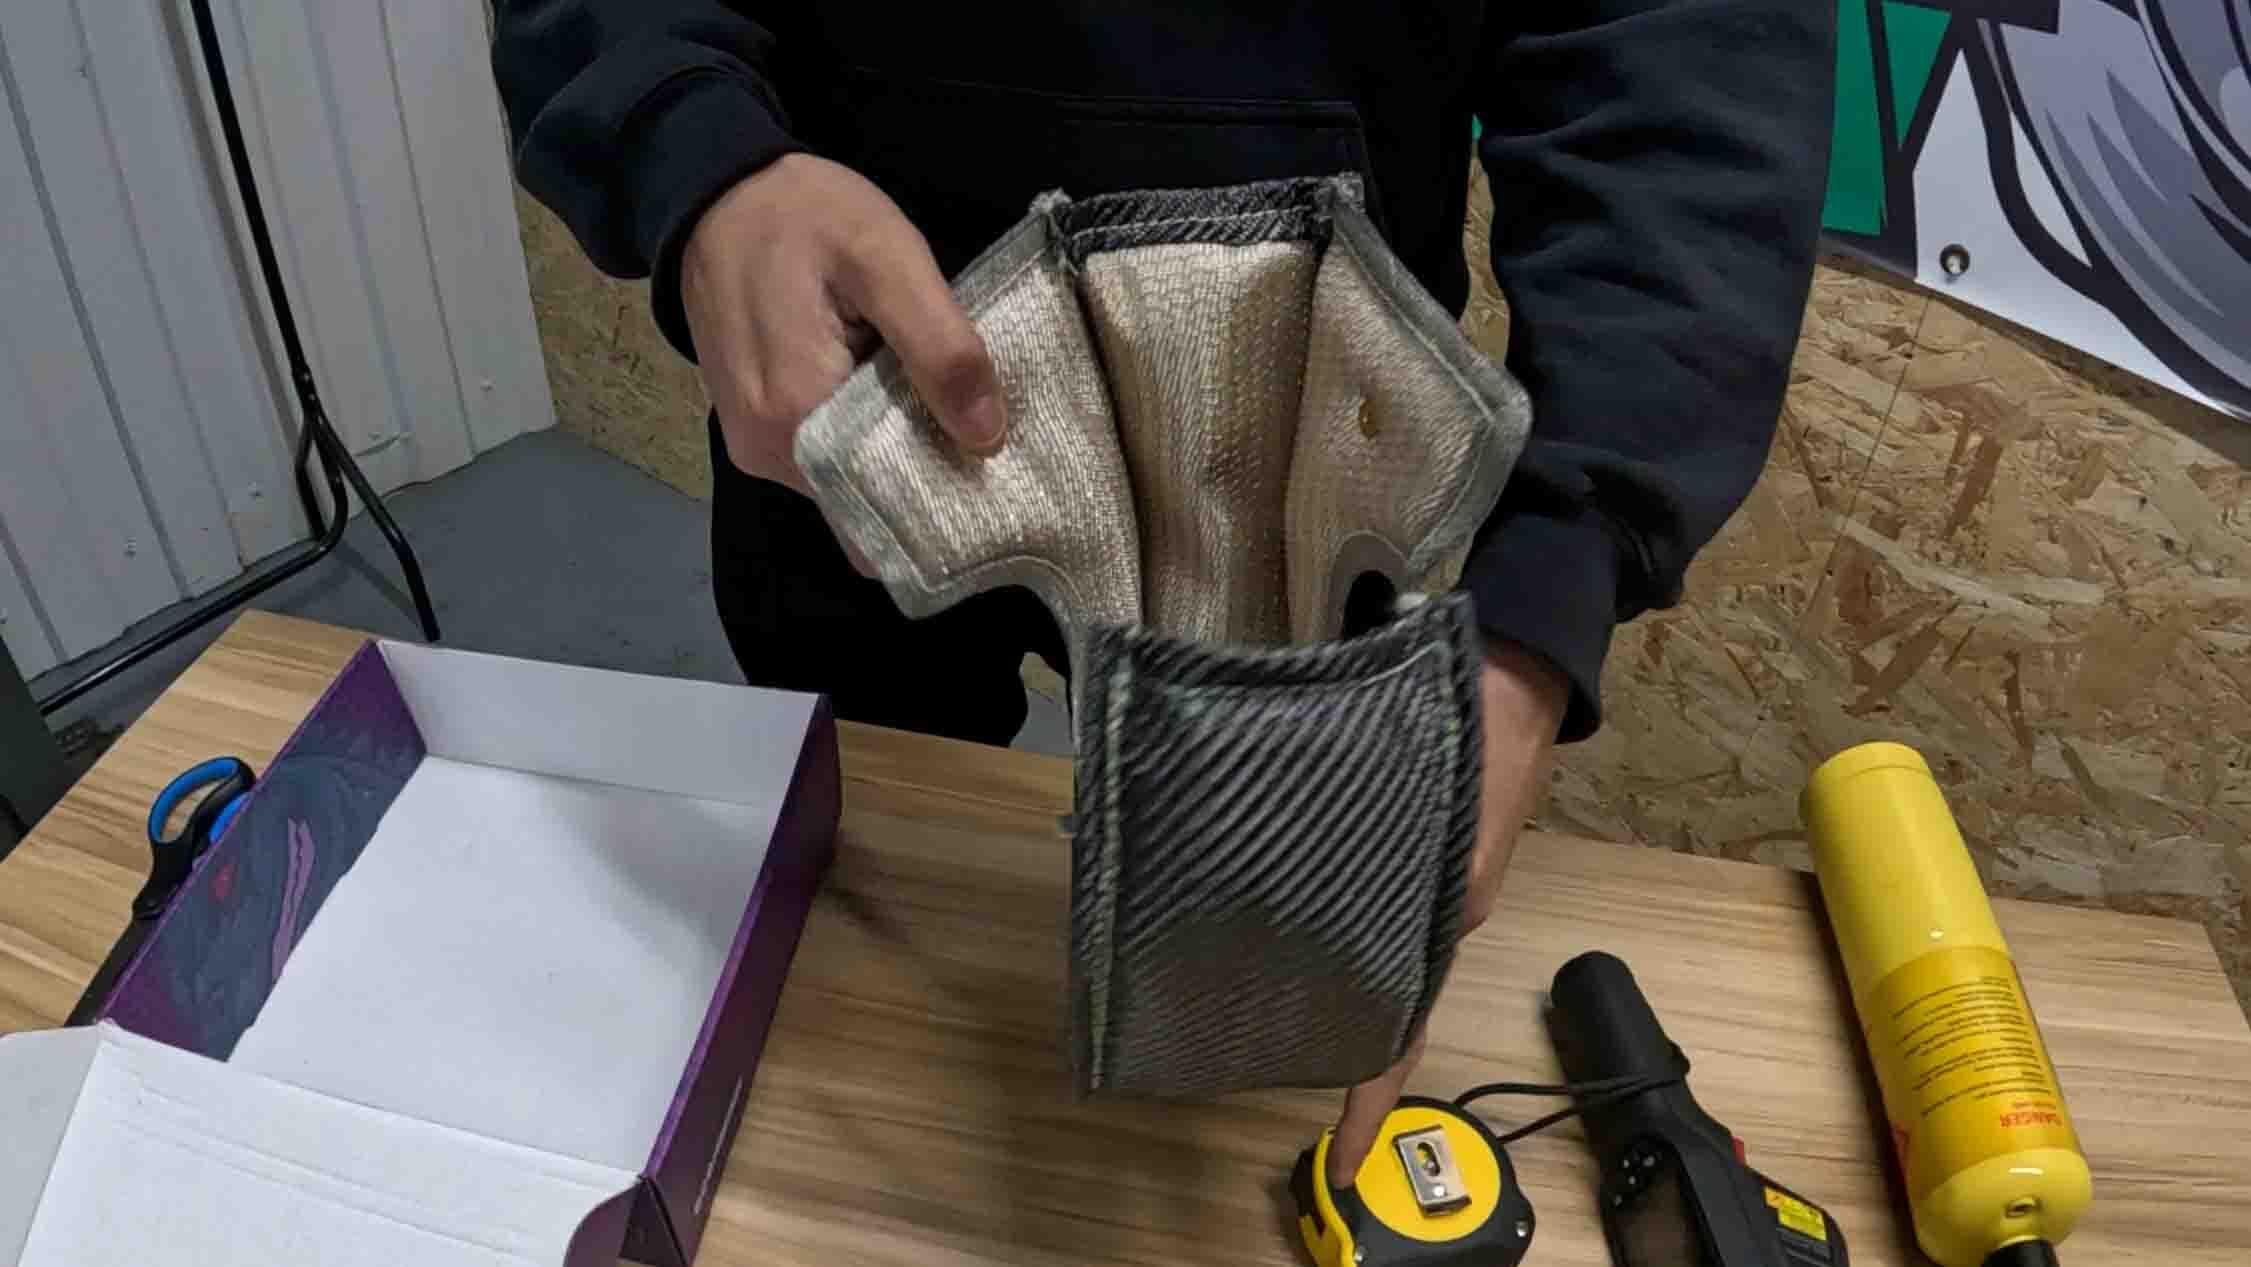
High-temperature weave exterior
The outer layer is a high-temperature weave designed to resist heat, hold the blanket together, and survive real engine bay use. It is built to withstand vibration and repeated heat cycles without failing.
There is a titanium and carbon fibre version available, but as shown in one of our older testing videos, the outer layer is great at resisting heat and helps to tie everything together, and looks great at the same time.

High temperature stitching
The last component used in the construction of the turbo blanket is the high-temperature Kevlar stitching. The reason we chose to use Kevlar is that it has an incredibly high tensile strength and exceptional heat resistance. The Kevlar sewing material needs to be strong to keep the turbo blanket together, but without melting under intense heat.
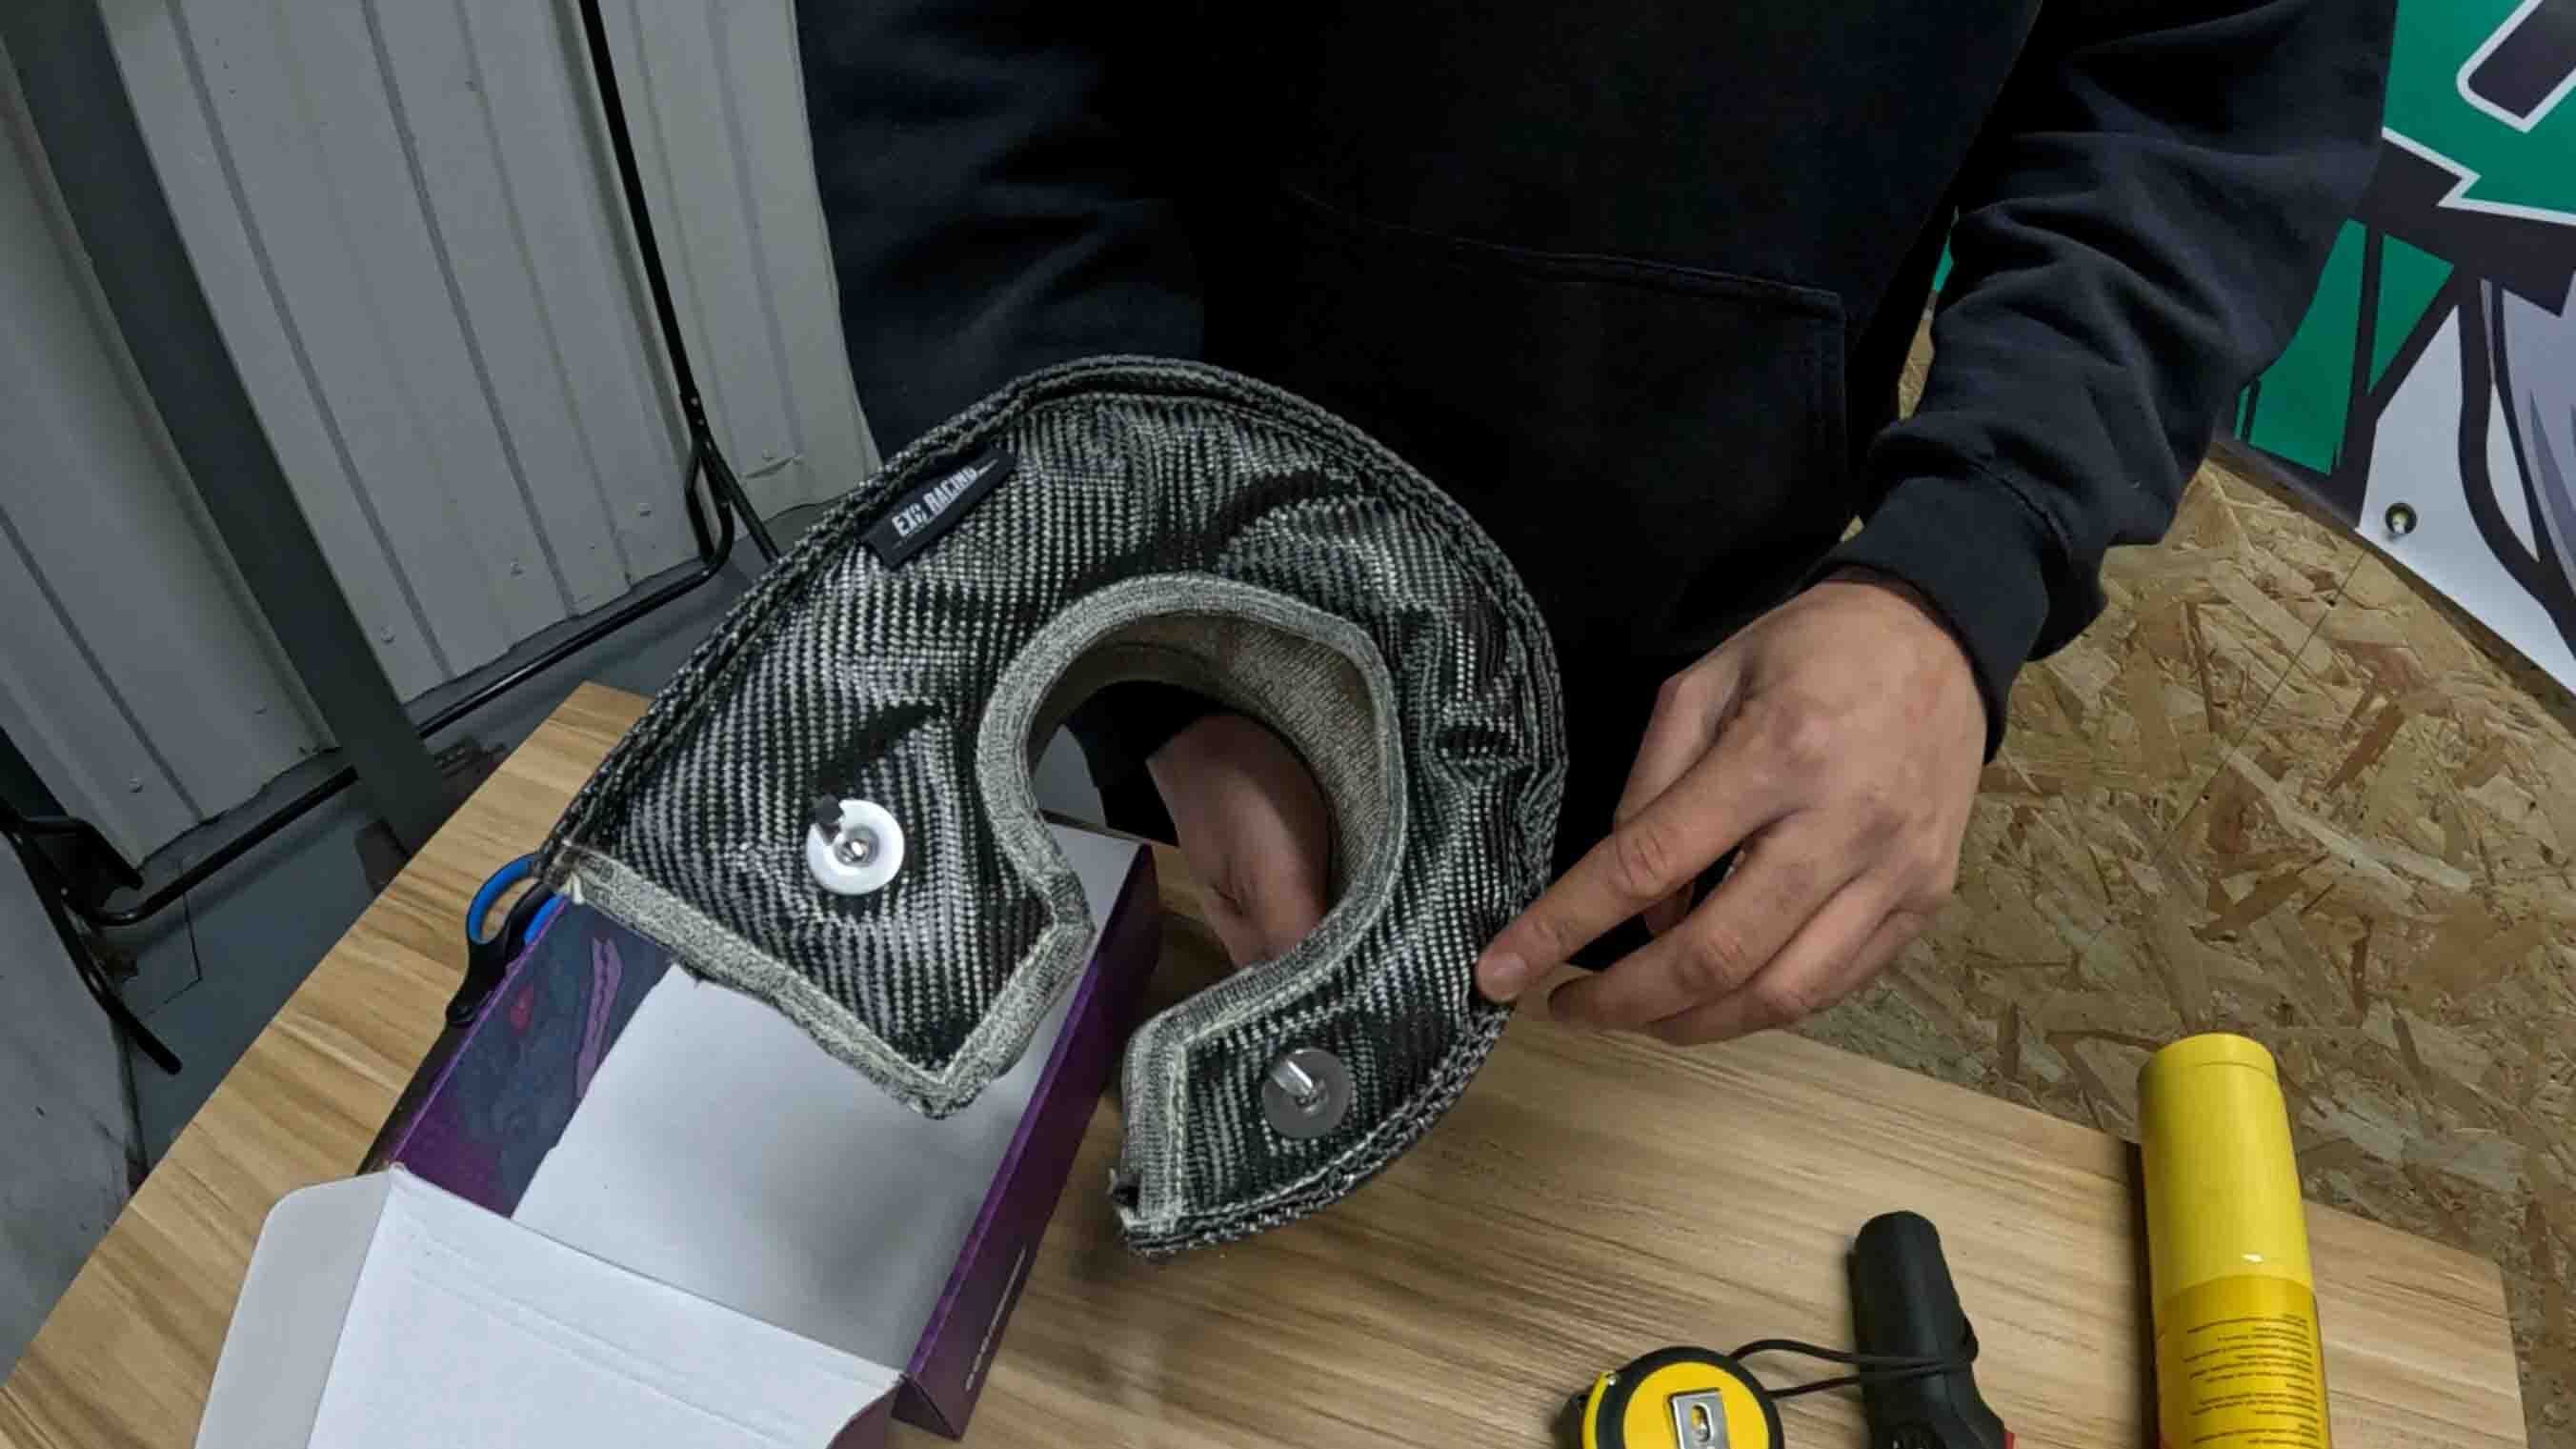
To sum up, the turbo blanket's performance comes from the insulating silica layer, and its durability comes from the rest of the components withstanding repeated abuse, not just from aesthetics.
A properly layered turbo blanket is built to take repeated abuse, not just look good for photos.
The Blanket Testing Method
We wanted a testing method you could understand instantly. We designed a controlled workshop experiment to demonstrate how our turbo blanket performs under direct flame and to capture thermal data you can use.
In many cases, a turbo blanket won't be exposed to a direct flame, especially inside the blanket, but this is the closest thing we can use to simulate the immense heat a turbo will produce over time.
Also, regarding temperature vs. time, on a road car or even a race car, there will always be on- and off-throttle periods so that temperature will fluctuate.
This test is going to be a full abuse session over a solid 3-minute period, which is more than you would produce in a 3-minute driving session.
What we used
- 1× Exoracing turbo blanket
- 1× Propane blowtorch
- 1× Thermal imaging camera
- 1 x Phone with timer
How we set it up
We placed the turbo blanket on a safe surface and positioned a propane blowtorch inside the blanket, pointing at the interior surface. This simulates heat generated within the turbo area.
The thermal camera was aimed at the outside of the blanket, the side that would face the engine bay. We used consistent measurement spots and recorded readings from ambient start.
The plan is to collect data over 3 minutes in 15-second intervals to simulate the difference between the interior and exterior of the blanket.
![]()
The propane torch will generate more heat than a turbocharger, so just in terms of temperature, this will be a great test to see how the materials withstand the heat.
A turbocharger can reach 1200°C, whereas the propane torch can produce up to 1900°C, although in the real world, we should be looking around the 1,100°C to 1,250°C mark, making it perfect for this test.
What we controlled
- Same flame position throughout each interval
- Same distance and angle between the propane torch and the turbo blanket
- same measurement spots on the turbo blanket
- Same environment, tested in one session to reduce ambient changes
What we measured
- Hot side temperature on the flame-facing surface
- Cold side temperature on the outside surface
- Delta or difference in temperature of the hot side minus the cold side
- Estimated reduction percentage based on surface temperatures at each interval
The key to this test is that a blowtorch is an aggressive heat source. Propane flame temperature can be extremely high, and even if the blanket is not seeing the absolute peak of the flame, it is still a severe stress test.
We chose this on purpose.
If a blanket survives this and still blocks heat, it is doing its job.
Turbo Blanket Blowtorch Test, Timed Intervals and Thermal Data
Now for the main test. We applied a direct flame to the blanket and recorded temperature readings at 15-second intervals for what was meant to be a continuous 3-minute period. The goal is simple: to show how heat transfer changes over time and how much heat the outside surface is protected from.
Sadly, we ended up having blow torch problems, with it spitting due to how we mounted it (oversight on our parts), and our thermal imaging camera capped at 580°C pretty much instantly. Because of this, we abandoned the original test and decided to show the temperature difference over time on the outside of the blanket.
For anyone who is interested, we reached the 1 minute 15 mark, with the inside showing 580°C (the thermal imaging camera's max temperature) but the outside showing 45.5°C.

Just in this test alone (which isn't even accurate), the temperature difference is a MASSIVE 534.5°C, which is a 92.15% decrease.
Later on, we melted the stainless steel mesh in one place, and stainless steel melts around the 1400°C mark, so if we are conservative and say the blowtorch ONLY reached 1400°C, this is still a 96.75% decrease between the inner and outer layer, which is absolutely massive in terms of heat transfer.
One thing we know is that the propane torch burns between 1000°C-1900°C, so if we just test the outside temperature, we can see the data over time.
This test is going to be a very close match to what will happen when you install one of our turbo blankets on your car, and will make an interesting graph to show the temperature changes over time.
If anything, you will actually gain more from having it on a turbocharger in a car, as air around the turbo, combined with moving air from motion and a radiator fan, will also reduce some of the temperatures around the turbo.
Testing intervals
- 15 seconds
- 30 seconds
- 45 seconds
- 1 minute
- 1 minute, 15 seconds
- 1 minute, 30 seconds
- 1 minute, 45 seconds
- 2 minutes
- 2 minutes, 15 seconds
- 2 minutes, 30 seconds
- 2 minutes, 45 seconds
- 3 minutes
Multiple intervals matter because they show whether the blanket stabilises, how quickly the cold side rises, and whether the thermal barrier continues to perform as exposure continues.
The chart below includes the temperatures we logged over the test, and below we will show you the plotted graph, which shows the temperature over time.
Thermal results table
| Interval | Outside temp °C |
|---|---|
| 0 seconds | N/A °C |
| 15 seconds | 9.8°C |
| 30 seconds | 10.5°C |
| 45 seconds | 17.4°C |
| 1 minute | 37.9°C |
| 1 minute 15 seconds | 38.3°C |
| 1 minute 30 seconds | 46.3°C |
| 1 minute 45 seconds | 47°C |
| 2 minutes | 52.9°C |
| 2 minutes 15 seconds | 54.1°C |
| 2 minutes 30 seconds | 56.7°C |
| 2 minutes 45 seconds | 59.2°C |
| 3 minutes | 62.3°C |
![]()
You can see from the graph above that it spikes in the centre, then starts to level out again. This is because we had to improvise halfway through the video to make sure the flame stopped spitting.
Because of this, Scott accidentally drifted closer to the blanket, which caused the huge spike, which levelled out when he realised and moved slightly further back from the blanket.
How do we calculate the estimated reduction? We use this simple formula: (Hot minus Cold) divided by Hot, then multiplied by 100. It gives a percentage of temperature drop from the inside surface to the outside surface. This is a clear way to show what the blanket is blocking in real time.
Watch the full test video
Durability Observations, During and After the Flame Test
Temperature reduction is only half the story. The other half is whether the blanket survives repeated heat cycles and abuse without degrading. A turbo blanket is not useful if it falls apart after a few heat soaks. So we watched closely during the test, then inspected the blanket afterwards.
During the test, we looked for
- Ignition or sustained burning
- Melting or dripping
- Outer weave breakdown
- Mesh deformation
- Insulation collapse
- Smoke and odour beyond normal surface contaminants are burning off
After the test, we inspected
- Stitching condition
- Outer weave integrity
- Mesh integrity on the turbo side
- Any brittle spots or weak points
![]()
When a blanket sees extreme heat, some cosmetic change is normal. Discolouration on the hottest spot, a little residue, and slight stiffening of heat-exposed fibres can happen. What matters is structure, stitching, and whether the blanket still holds shape and still insulates the way it should.
We saw some of the stainless steel melt on the inside, which means the blowtorch would have been at or above 1400°C. This is around 200°C more than a turbocharger generally produces at maximum, so there is virtually 0 chance this could happen in the real world.
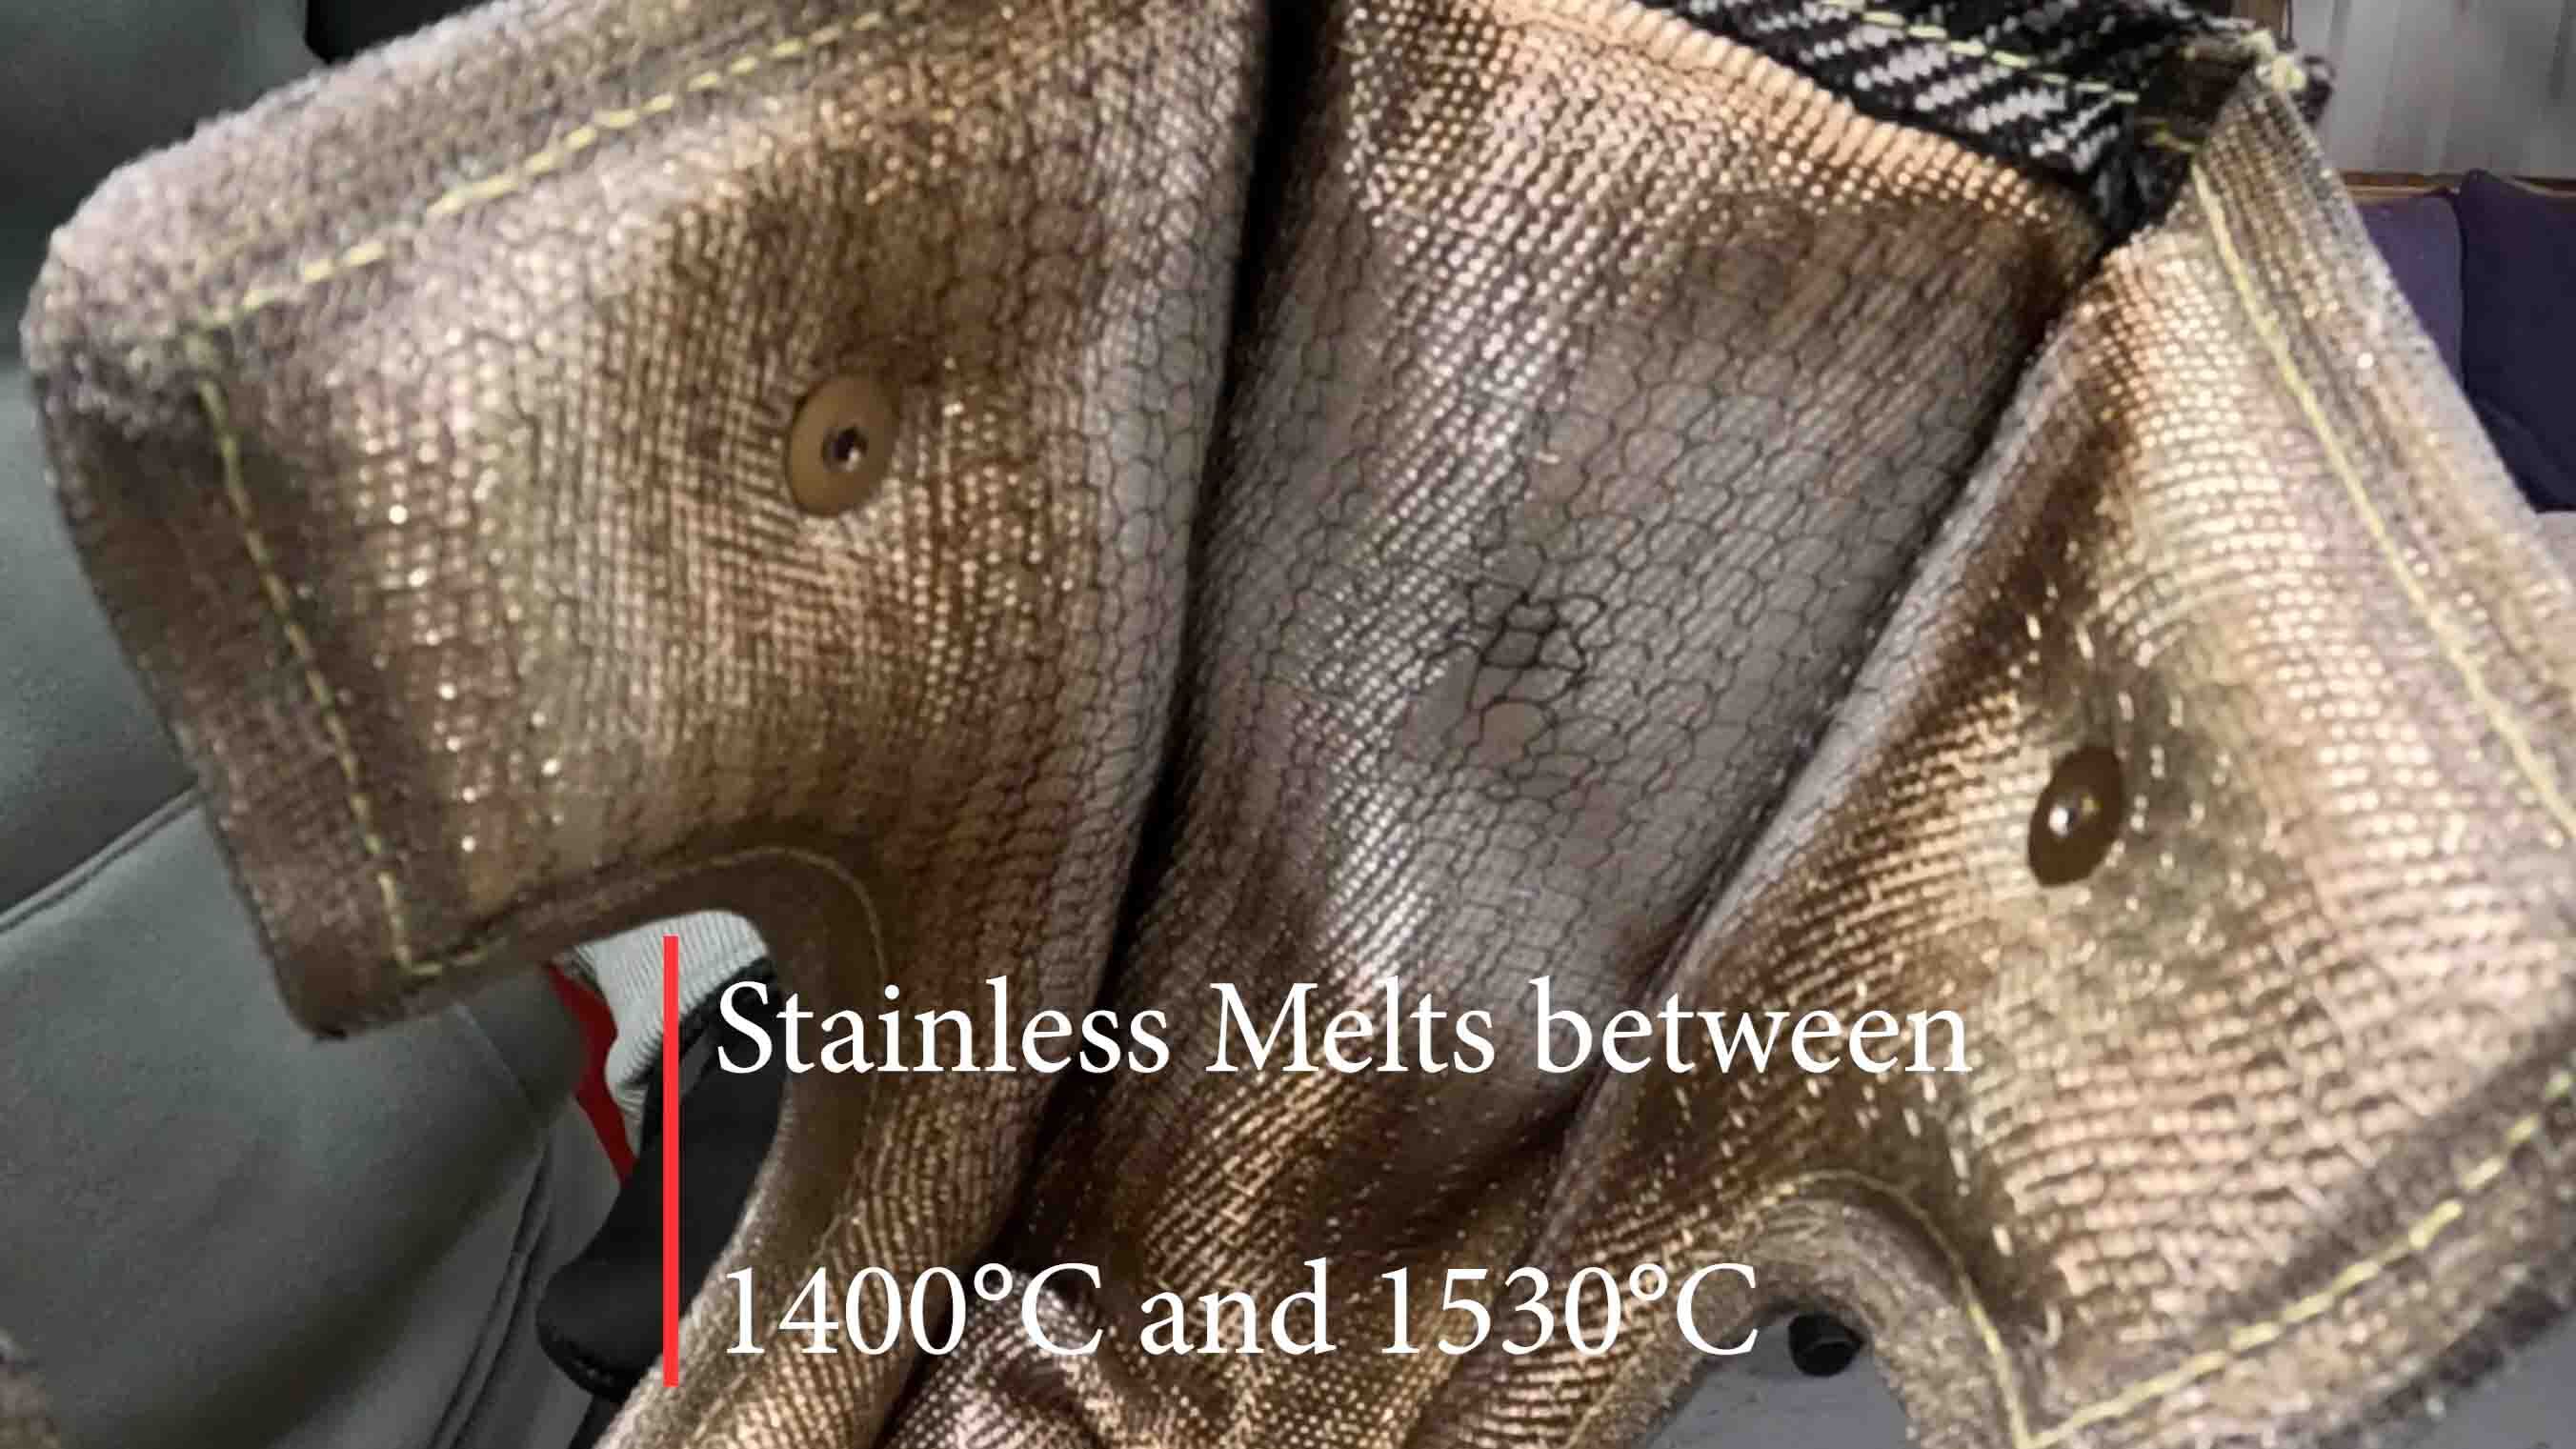
Even with this small amount of melted stainless, other than slight discolouring, the silica layer looked like it hadn't even been touched (which you can see in the after report from the video above).
Another thing to note is that, as the outer layer was so cold because of how good the thermal properties of the turbo blanket are, it didn't even discolour.
There was no visible sign on the outside that we had even performed the test on it!

Overall, even though we couldn't get an EXACT percentage drop over time, which was the goal from the start, we still saw a 92.15% decrease in temperature using the thermal camera max temperature rating. This is still pretty crazy, and more than we would have expected.
It even survived the beard singe test!

We will be revisiting this test in the future with a better thermal camera (although we looked and they are thousands of pounds, so maybe not just yet haha!).
Once we have refilmed the test, we can get accurate, definitive data to show exactly the difference between the inner and outer layers up to our blowtorch maximum of around 1000°C-1900°C.
Common Myths About Turbo Blankets
Myth 1: Turbo blankets are only for looks
Looks are a bonus, not the reason to use one. If a turbo blanket meaningfully reduces heat transfer, you will see it in surface and core temperatures.
That is why we used a thermal camera to show the reduction visually and make it measurable, not just a claim you have to trust without data.
Whether you think turbo blankets look good or not is one 1-degree; whether they work or not isn't. Going by the data, and pushing to the extreme, even a 1-degree temperature drop is still a drop in temperature, although you can clearly see from the images and charts above that this isn't the case, as we saw a MINIMUM of a 92.15% decrease.
Myth 2: All turbo blankets are the same
Construction matters when it comes to turbo blankets. Insulation type and density, protective mesh, weave durability, and stitching quality all affect how a blanket behaves under heat cycles.
This is why we explain our layers and why we torture test the blanket instead of asking you to take our word for it.
The data clearly show a significant reduction over a long period. We could have run this test for 30 seconds, but in reality, a car isn't only driven for 30 seconds at a time, so 3 minutes was a better timeframe for constant exposure.
Myth 3: Turbo blankets are only for race cars
Street cars still suffer from heat soak, especially on modern turbo engines where packaging is tight, and airflow under the bonnet can be limited. Lower engine bay heat helps reliability and consistency, whether you drive to work or do track days.
We have seen huge reductions in both applications, but generally, you will get the MOST benefit the hotter the turbocharger is, because as a physical value, you will drop the temperatures more than a stock road car.
Obviously, this is a very broad statement and depends on a huge amount of factors, but if you are basing every variable like for like at 200bhp v 800bhp, the 800bhp car will receive the highest benefit from a turbo blanket.
What the Numbers Mean for Your Engine Bay
Now we have collected all of the data we need; this is what matters most. What the numbers mean in practical terms for you and your car's engine bay.
- Lower adjacent temperatures. If the cold side stayed around 60°C while the hot side was 800°C, that is a strong indicator of reduced radiant heat reaching nearby components.
- Large difference equals real thermal protection. If the difference stayed at 740°C or more, that means the blanket is consistently acting as a thermal barrier across the whole test.
- Stable reduction percentage. If the reduction stabilised around 90-95%, that suggests predictable performance during sustained exposure
In plain terms, the blanket is doing two things simultaneously. It reduces the heat reaching everything around the turbo and slows heat transfer through the blanket itself. That is precisely what protects wiring, hoses, reservoirs, intake pipework, and anything else located near the hot side.
Explore the Exoracing heat management range.
FAQ
Does using a blowtorch actually simulate what happens to a turbo blanket on a car?
Yes, and in fact, it's more extreme. A propane torch can reach 1,900°C at the flame tip, but in this test, it's probably closer to the 1,100°C to 1,250°C mark, while most turbos operate at exhaust temperatures between 850°C and 1,050°C.
The test pushes the blanket beyond what it would face on a vehicle, showing its durability and heat-blocking performance in a worst-case scenario.
In a car, heat is distributed across the turbo blanket inner circumference rather than concentrated in a single area, so there are differences, but overall, as far as material testing and temperature reductions go in terms of simulation, this is accurate.
How much heat does the turbo blanket actually block in this test?
The thermal camera showed a significant temperature drop between the inside (flame side) and the outside surface of the blanket.
The reduction was consistent over 3 minutes, with a measurable delta at every 15-second interval. This demonstrates that the turbo blanket absorbs and resists heat transfer over time, not only in the first few seconds.
If you go back through the graphs outlined above, you can see the definitive numbers from our test to see the exact differences in temperature.
Did the turbo blanket catch fire or melt during the test?
No. The blanket showed zero signs of ignition, melting, or structural failure during or after the full 3-minute blowtorch exposure.
The only part that melted was the stainless steel mesh, which means it was exposed to around 1400°C, which is more than a turbocharger would produce.
When the outer insulation was run through the same experiment (in one of our older videos on YouTube), the inner insulation held up without collapsing or degrading.
I'll add the video here so you can see a similar test on the outside of the blanket.
What materials are used in the turbo blanket that make it survive direct flame?
The blanket uses a multi-layer construction: stainless steel mesh on the turbo-facing side, thick silica wool insulation in the core, a high-temp exterior weave, and Kevlar stitching.
Each layer serves a purpose. The stainless mesh dissipates and spreads heat, the core blocks it, the weave resists external abrasion, and the stitching holds it together under high stress.
How does this test relate to real-world engine bay performance?
While your engine bay won’t usually see direct flame, the test demonstrates that the blanket's materials perform under worse-than-real conditions.
In a real setup, engine bay airflow, motion, and ambient cooling will help the blanket perform even better. This means lower heat soak, longer component life, and more consistent performance.
Conclusion
Now that you have seen everything in our testing and all of the data we collected, you will see that turbo heat is real, and heat damage can be expensive.
This blowtorch and thermal imaging test is our way of showing proof of two things. Durability under direct flame abuse and measurable temperature reduction across the turbo blanket.
Even though we couldn't complete the exact test we wanted of showing the exact difference between the blow torch and turbo blanket, we still had a pretty good outcome, as we saw a minimum of a 92.15% decrease (the difference between the thermal imaging camera max temperature of 580°C and the outer blanket layer showing 45.5°C in our first test.
If you came into this thinking turbo blankets do nothing, the numbers and the thermal footage will give you a clear answer.
We are going to be filming another test in the future, showing this in an engine bay to show real-world data, and we are going to refilm this test to get a more accurate data point.
This was more to show you exactly how turbo blankets work and the sort of temperature differences you can expect when exposed to extreme temperatures.
If you want help choosing heat protection for your setup, browse the range below or message us with your engine bay setup. We are more than happy to run you through the best options for your car. Even if you just want a bit of advice, we are here to help as much as we can!
Related products
Related reading
- What is a turbo blanket
- How to install a turbo blanket
- 3 essential upgrades to protect your turbo setup
About the author
I’m Matt, the owner of Exoracing Ltd, a UK-based performance parts brand specialising in heat management and performance parts.
Since 2018, we have helped thousands of car enthusiasts and workshops reduce engine bay temperatures with tested, proven products backed by first-hand experience from our own and customers' builds.
Got questions about your setup? Message us on Instagram @exoracinguk or use the contact options on our website. We love seeing your builds and helping out.