
Exoracing Heat Management Test Centre
Posted by Matthew Marks on 25th Jun 2026
Exoracing Heat Management Test Centre
This is our central library for Exoracing heat management test results, thermal camera checks, installation proof and product limitations. If we test a turbo blanket, heat sleeve, exhaust wrap, reflective tape, heat shield or related heat product, this is the page we will keep updated.
Tested by Exoracing, a UK heat management and performance parts specialist helping road, track and high-power cars control engine bay heat since 2018.
Bookmark this page, as every future Exoracing heat management test will be linked from here once the data, photos and limitations are ready.
Shop tested heat management products- This page collects all of our Exoracing heat management test results in one place.
- Our strongest current measured tests are the turbo blanket blowtorch test and the 550bhp Audi RS4 before-and-after test, with the headline figures shown below.
- Every result is tied to its method, limitation and useful next step, so the data is not treated as a universal promise.
- Future heat sleeve, exhaust wrap, reflective tape, heat shield and vehicle tests will be added here as soon as measured data is published.
The simple answer
The Exoracing Heat Management Test Centre is the place to check our real heat management test results before choosing a product. It brings together controlled tests, real-car before-and-after data, installation proof and test limitations.
Our current measured public data shows why source control matters. In our turbo blanket blowtorch test, the flame-facing side reached the thermal camera's 580°C maximum while the outside surface was 45.5°C in the first run. In our 550bhp Audi RS4 test, the measured turbo-area surface dropped from 117.8°C to 70.0°C after fitting turbo blankets.
Those results are useful proof, but they are not a promise that every car will see the same figures. Heat management depends on the heat source, the vulnerable part, the product used, the installation quality, the test method and the condition of the vehicle.
- Turbo blanket blowtorch test: the flame-facing side reached the thermal camera's 580°C maximum while the outside surface measured 45.5°C in the first run.
- 550bhp Audi RS4 turbo blanket test: the measured turbo-area surface dropped from 117.8°C to 70.0°C after fitting turbo blankets.
- Important limitation: these are real Exoracing test results, not a universal promise. Different cars, installs, routes, ambient temperatures and test methods can change the final numbers.
Current Exoracing Heat Management Test Results
This table is the live index for our heat management testing. It separates measured test data from installation proof so you can see which results are backed by numbers and which areas still need a dedicated measured test.
Direct propane flame, thermal camera readings and post-test inspection on an Exoracing Turbo Blanket V3. Headline result: 580°C camera-limited hot side versus 45.5°C outside surface in the first run.
Surface temperature, engine bay area readings and intake air temperature logs before and after fitting turbo blankets. Headline result: turbo-area surface dropped from 117.8°C to 70.0°C.
Shows surface prep, fitment method and where reflective tape should be used. A measured radiant heat comparison will be added next.
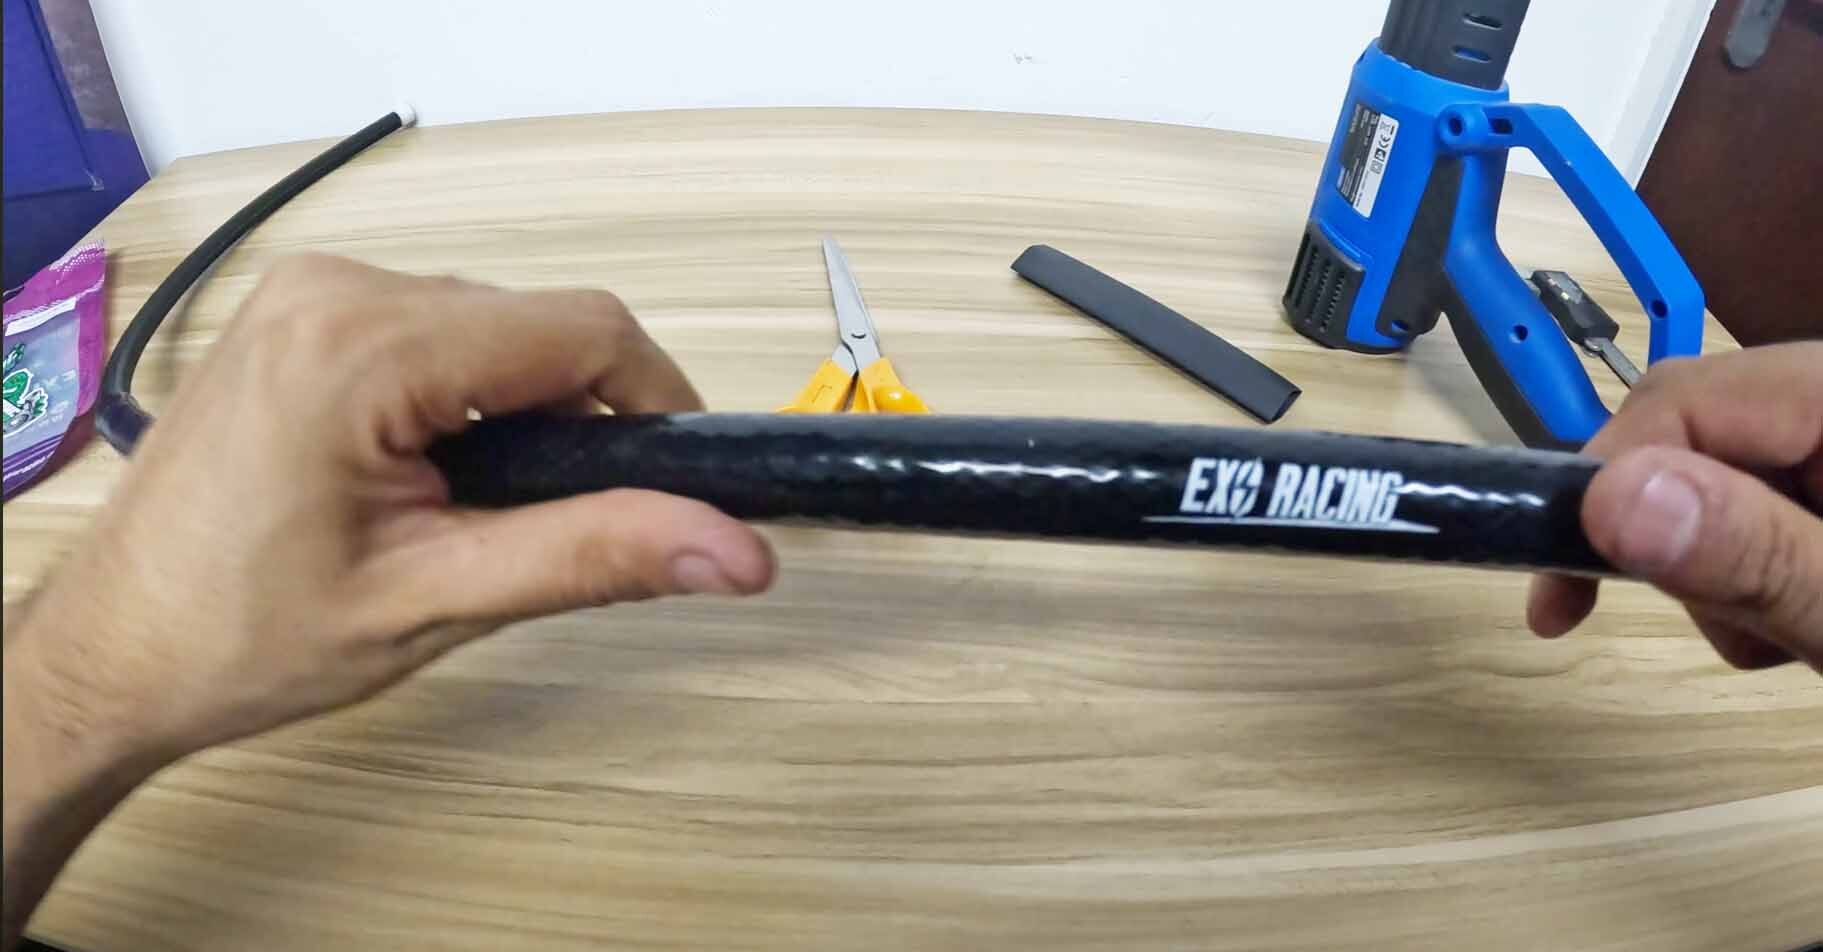
Shows how to measure, cut, fit and secure the sleeve on hoses, lines and wiring. A line-temperature protection test will be added next.
Shows wrap use on hot pipework and the fitting details that affect durability. A before-and-after pipework temperature test will be added next.
Test 1: Turbo Blanket Blowtorch Test
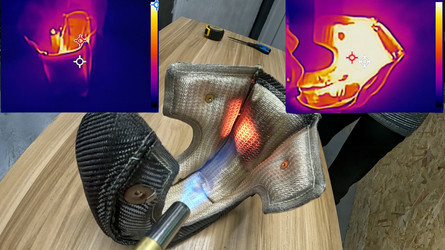
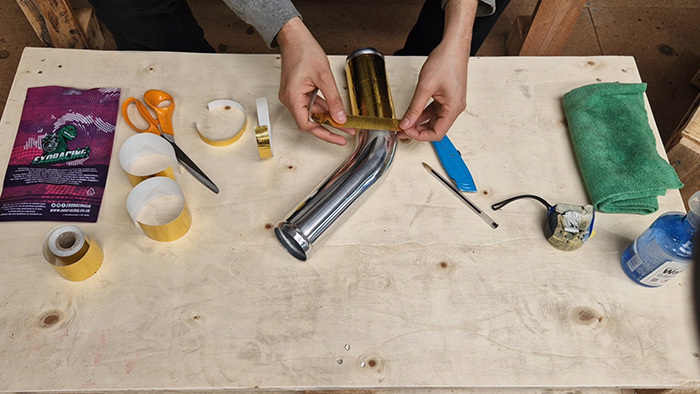
Our most direct controlled test so far is the turbo blanket blowtorch test with thermal data. We used an Exoracing Turbo Blanket V3, a propane blowtorch, a thermal imaging camera and timed readings to see how the outside surface behaved under direct flame exposure.
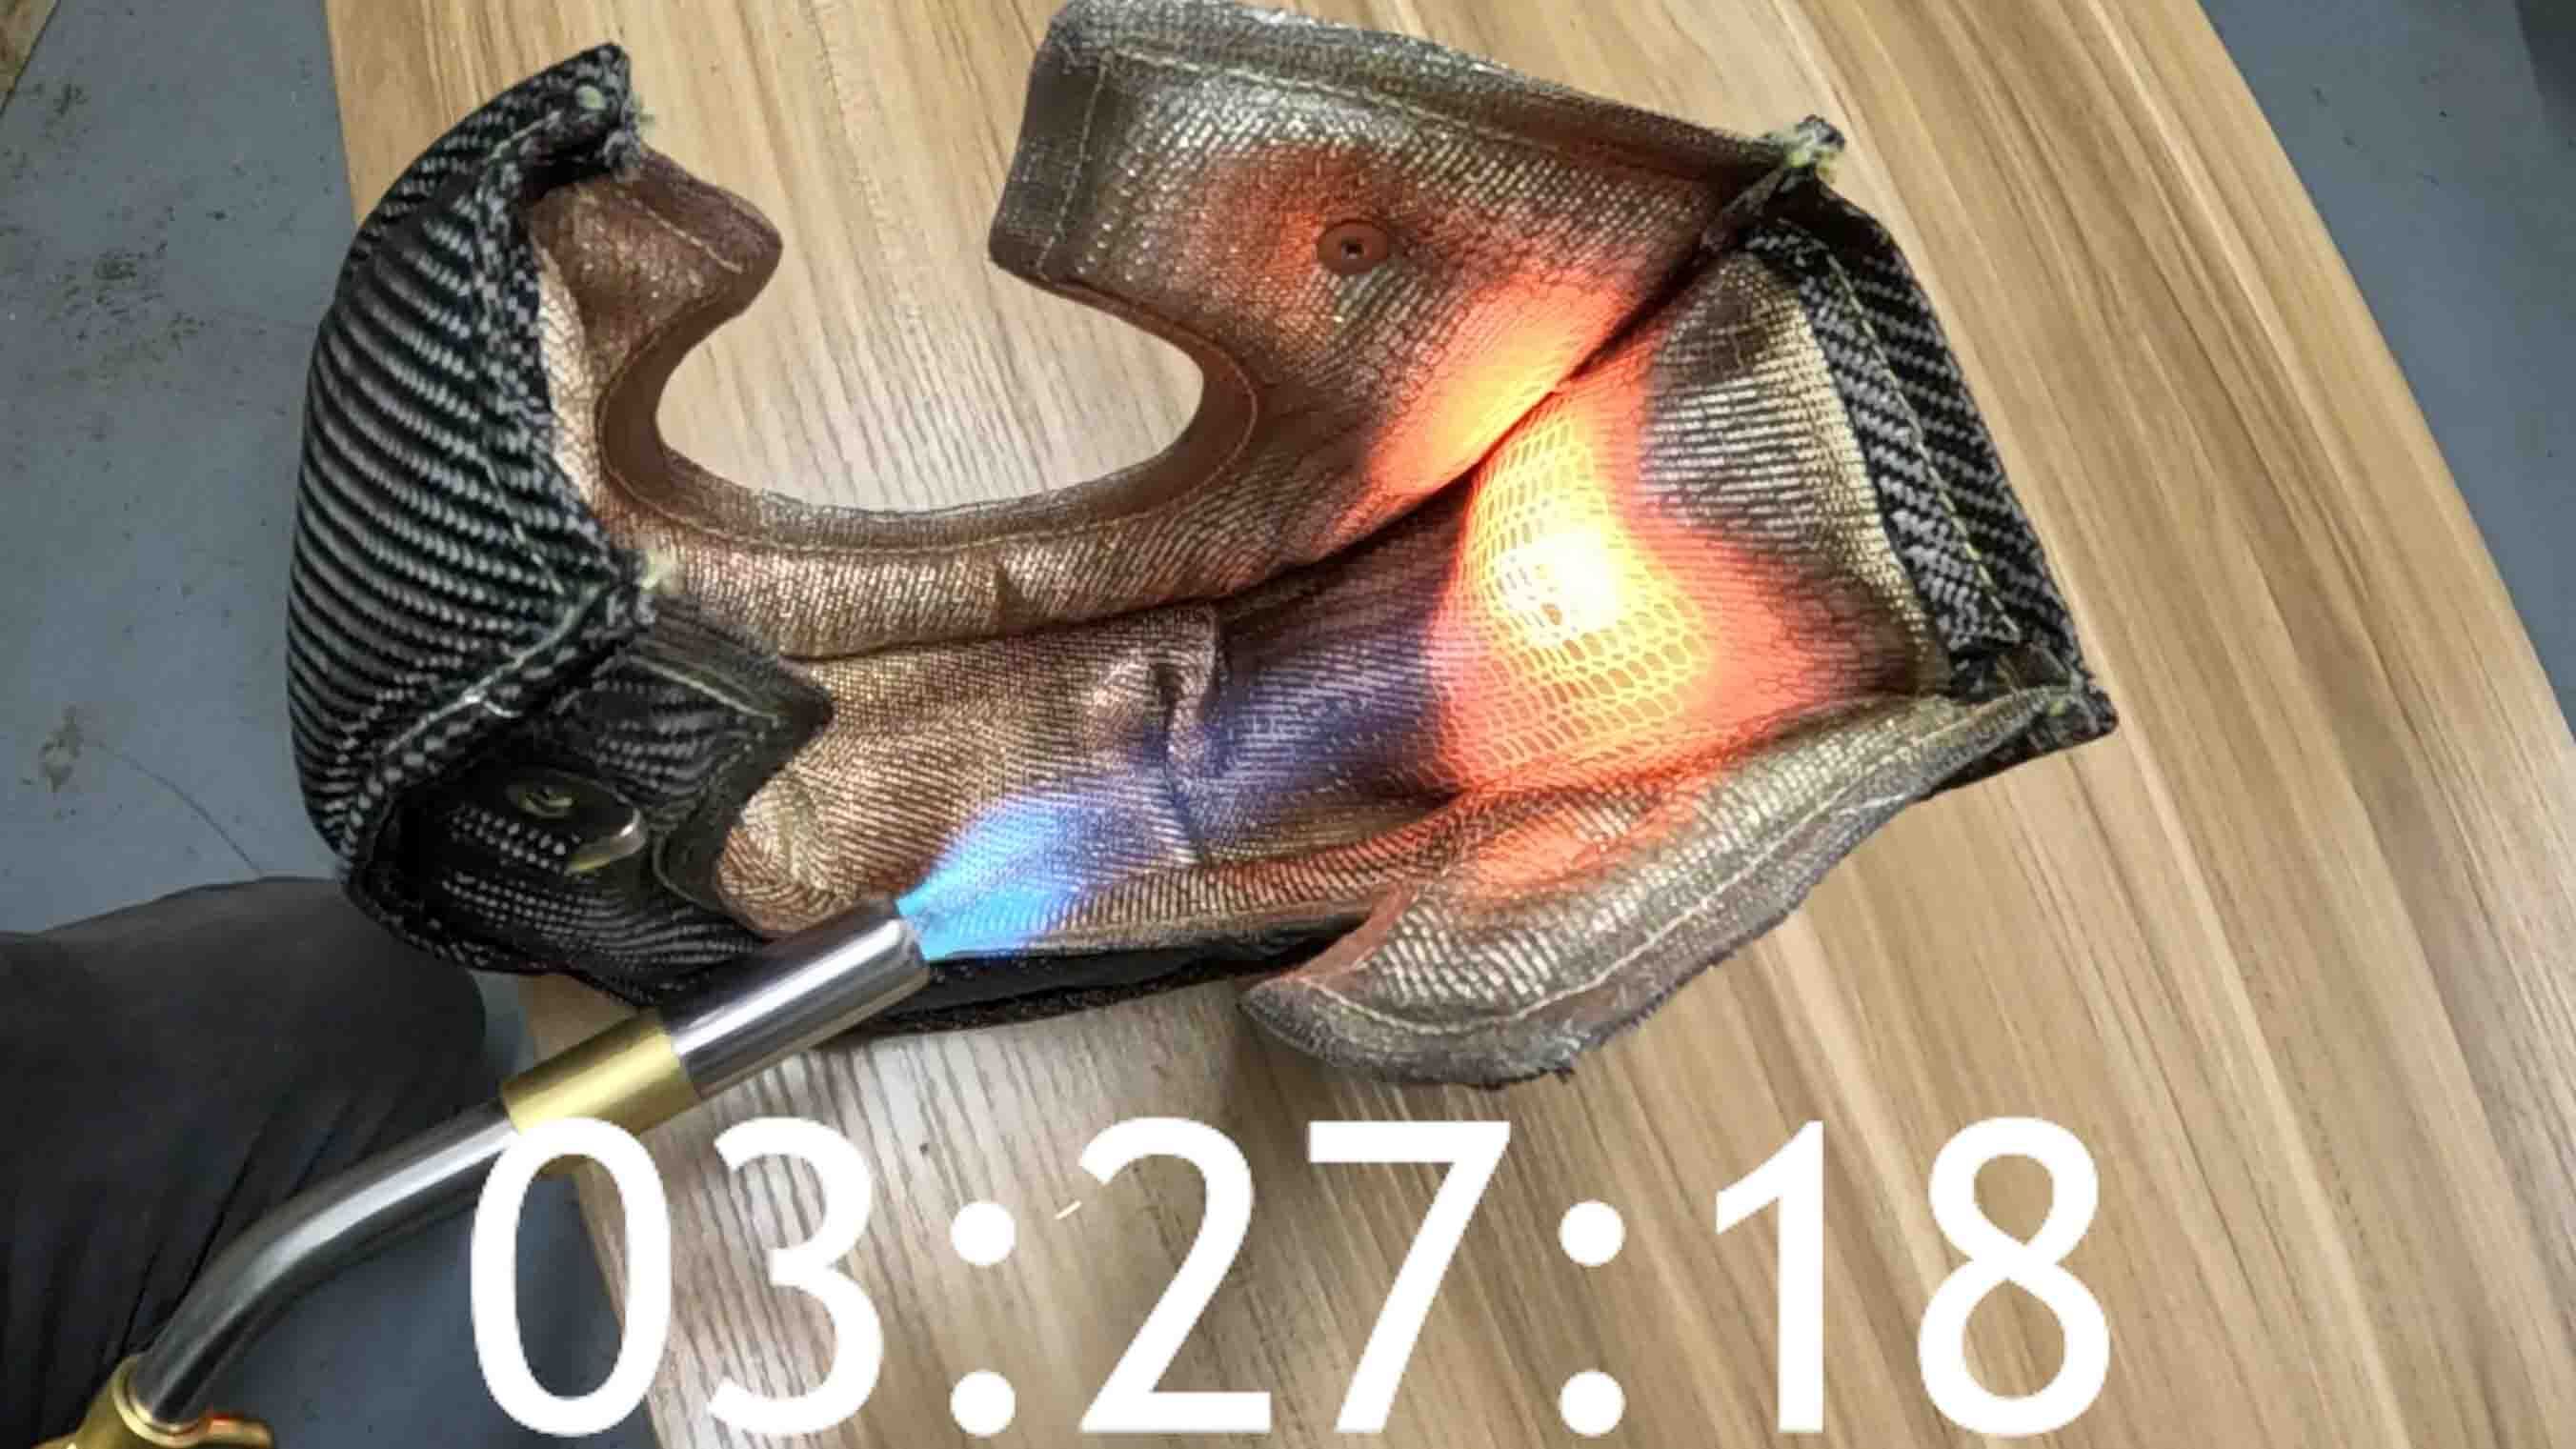
The turbo blanket blowtorch setup shows the direct flame exposure used during the controlled bench test.
In the first run, the flame-facing side reached the thermal camera's 580°C maximum while the outside surface was 45.5°C. That gives a measured difference of 534.5°C from the camera-limited hot-side reading. Because the hot side may have been hotter than the camera could display, that figure should be treated as a minimum measured difference, not the exact maximum temperature.

This thermal image shows why we call the hot-side result camera-limited: the hot side reached the camera's maximum while the outside surface stayed much cooler.
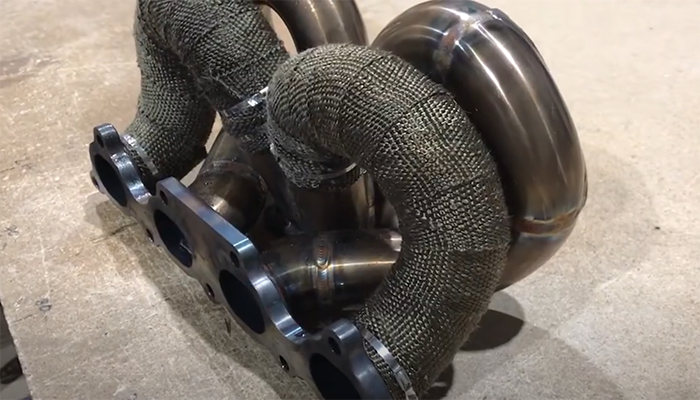
In the longer outside-temperature run, the outside surface reached 62.3°C after three minutes of sustained direct flame exposure. The stainless steel mesh was locally damaged due to the flame being over the point at which stainless steel melts, but the blanket did not catch fire, and the outer weave did not visibly fail in the test.
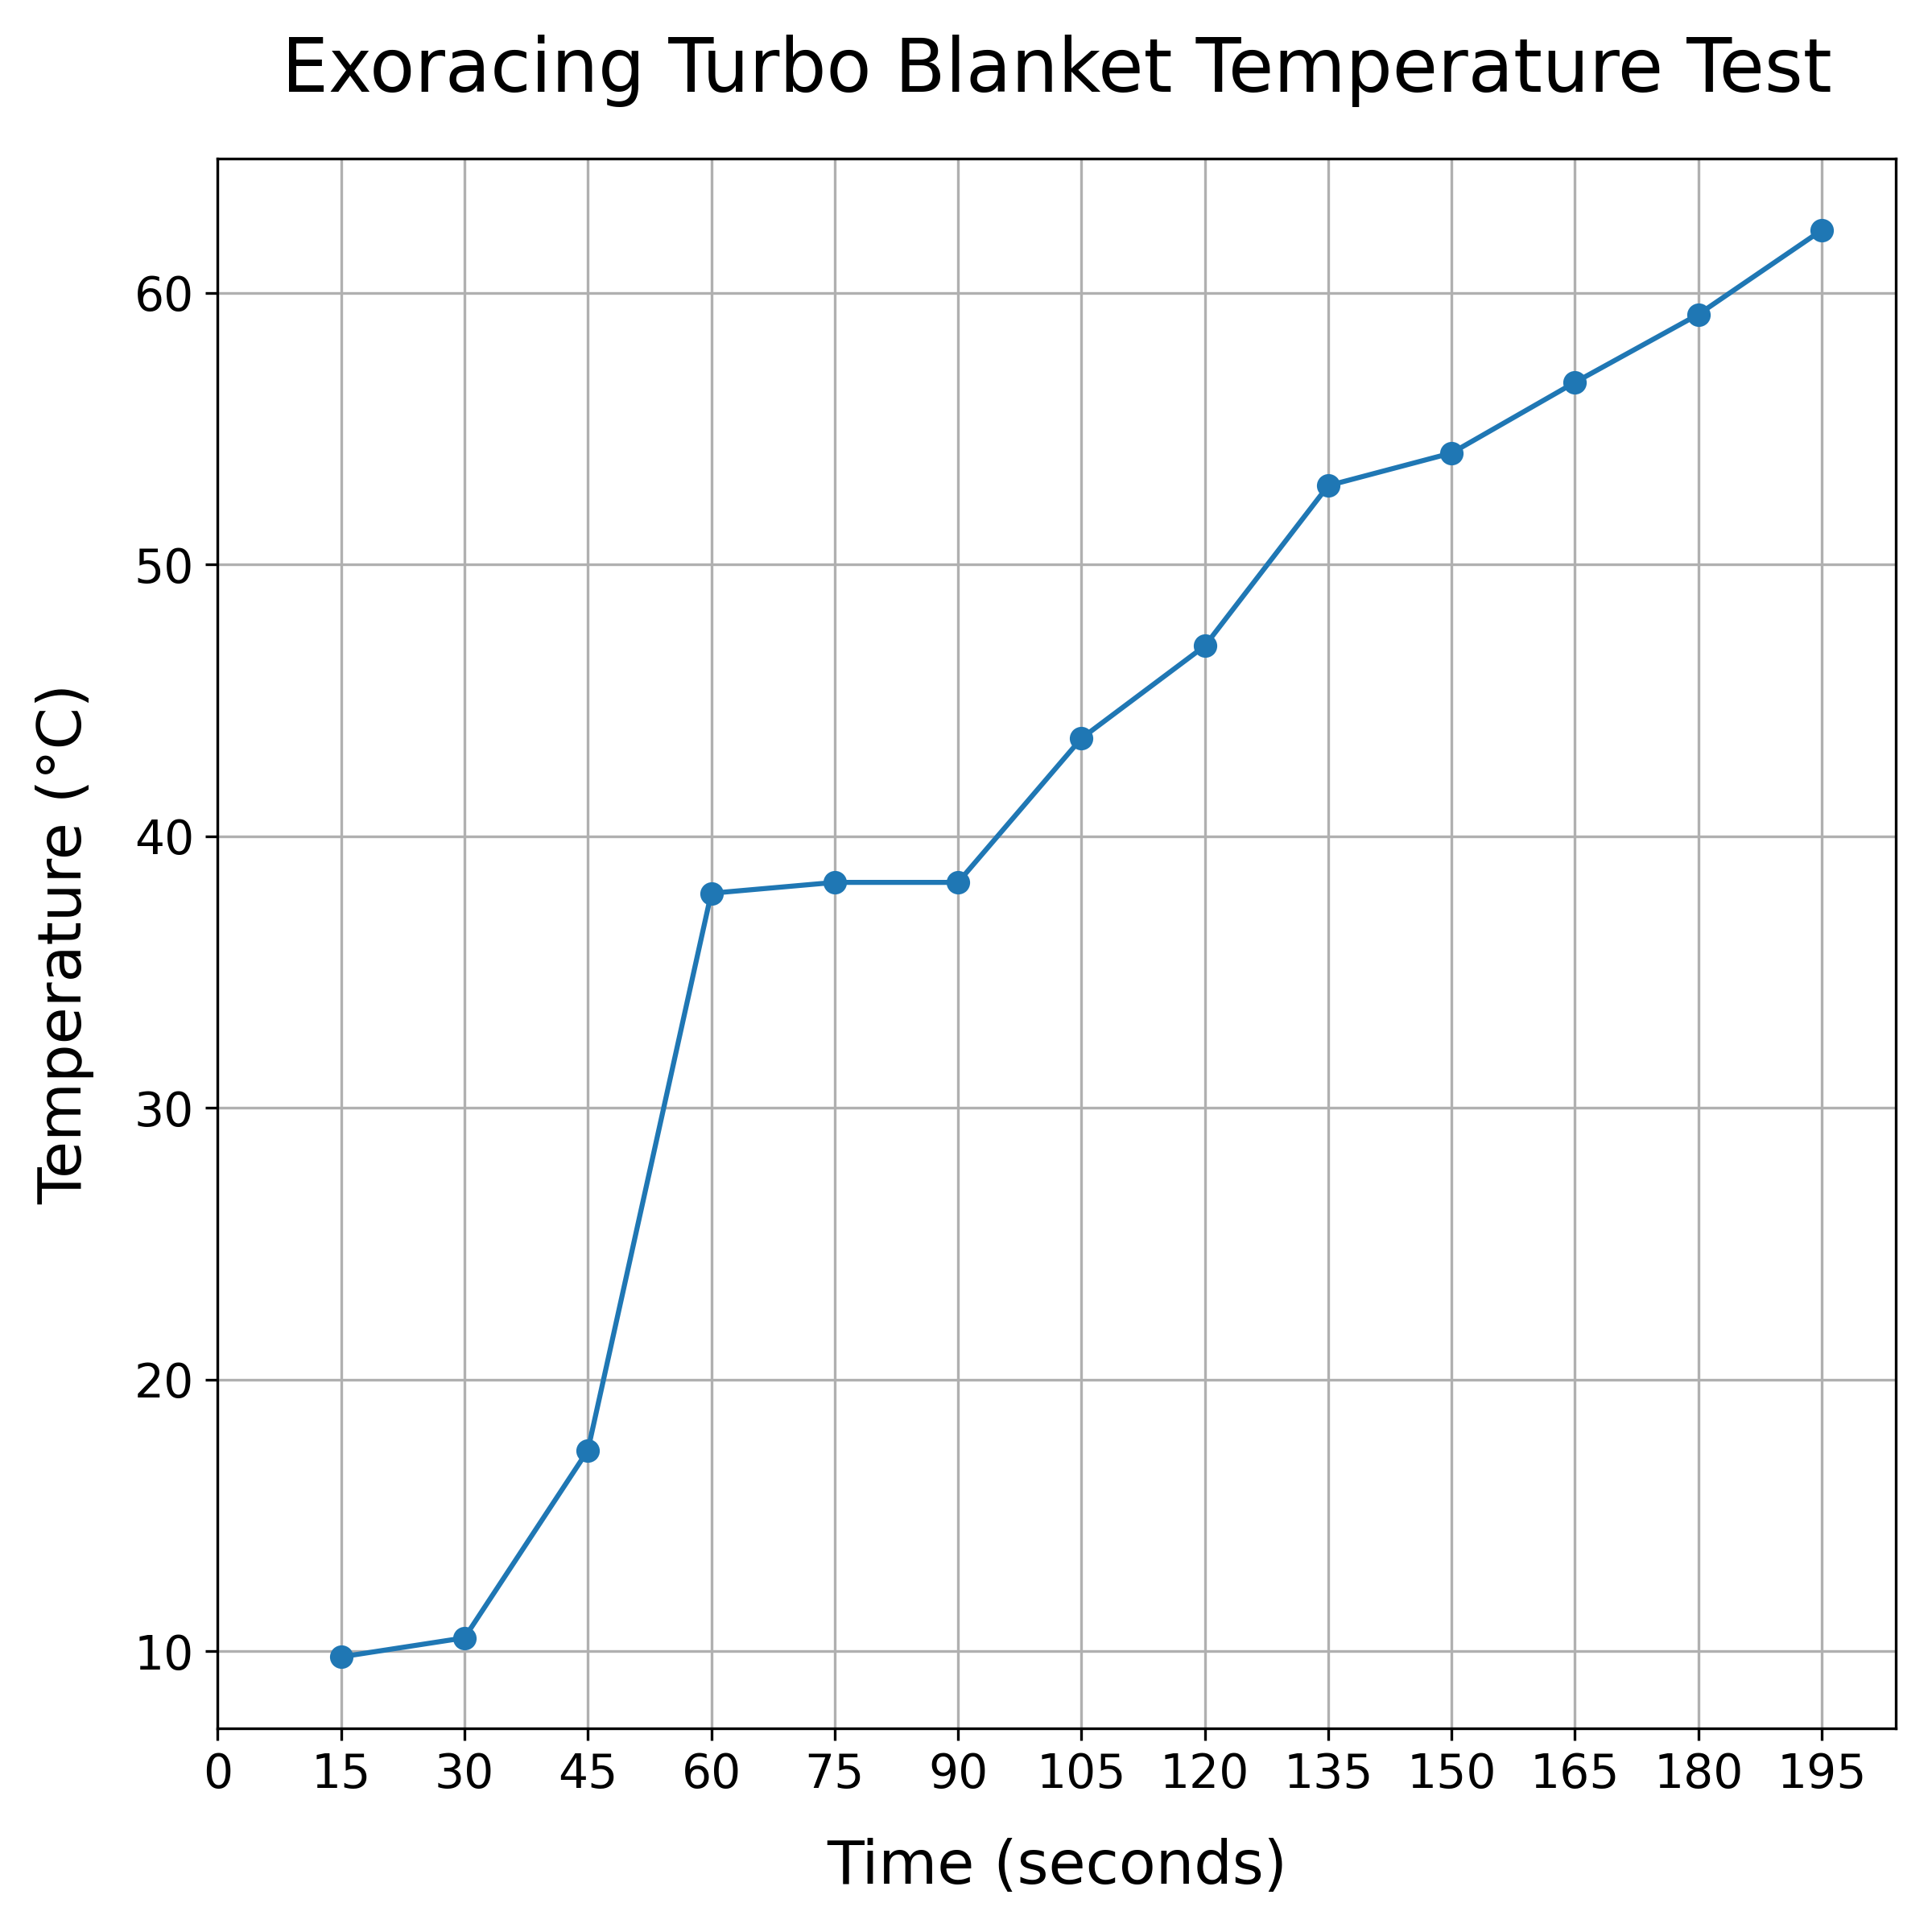
The logged outside surface temperature shows how the engine-bay-facing side changed during the longer direct flame run.
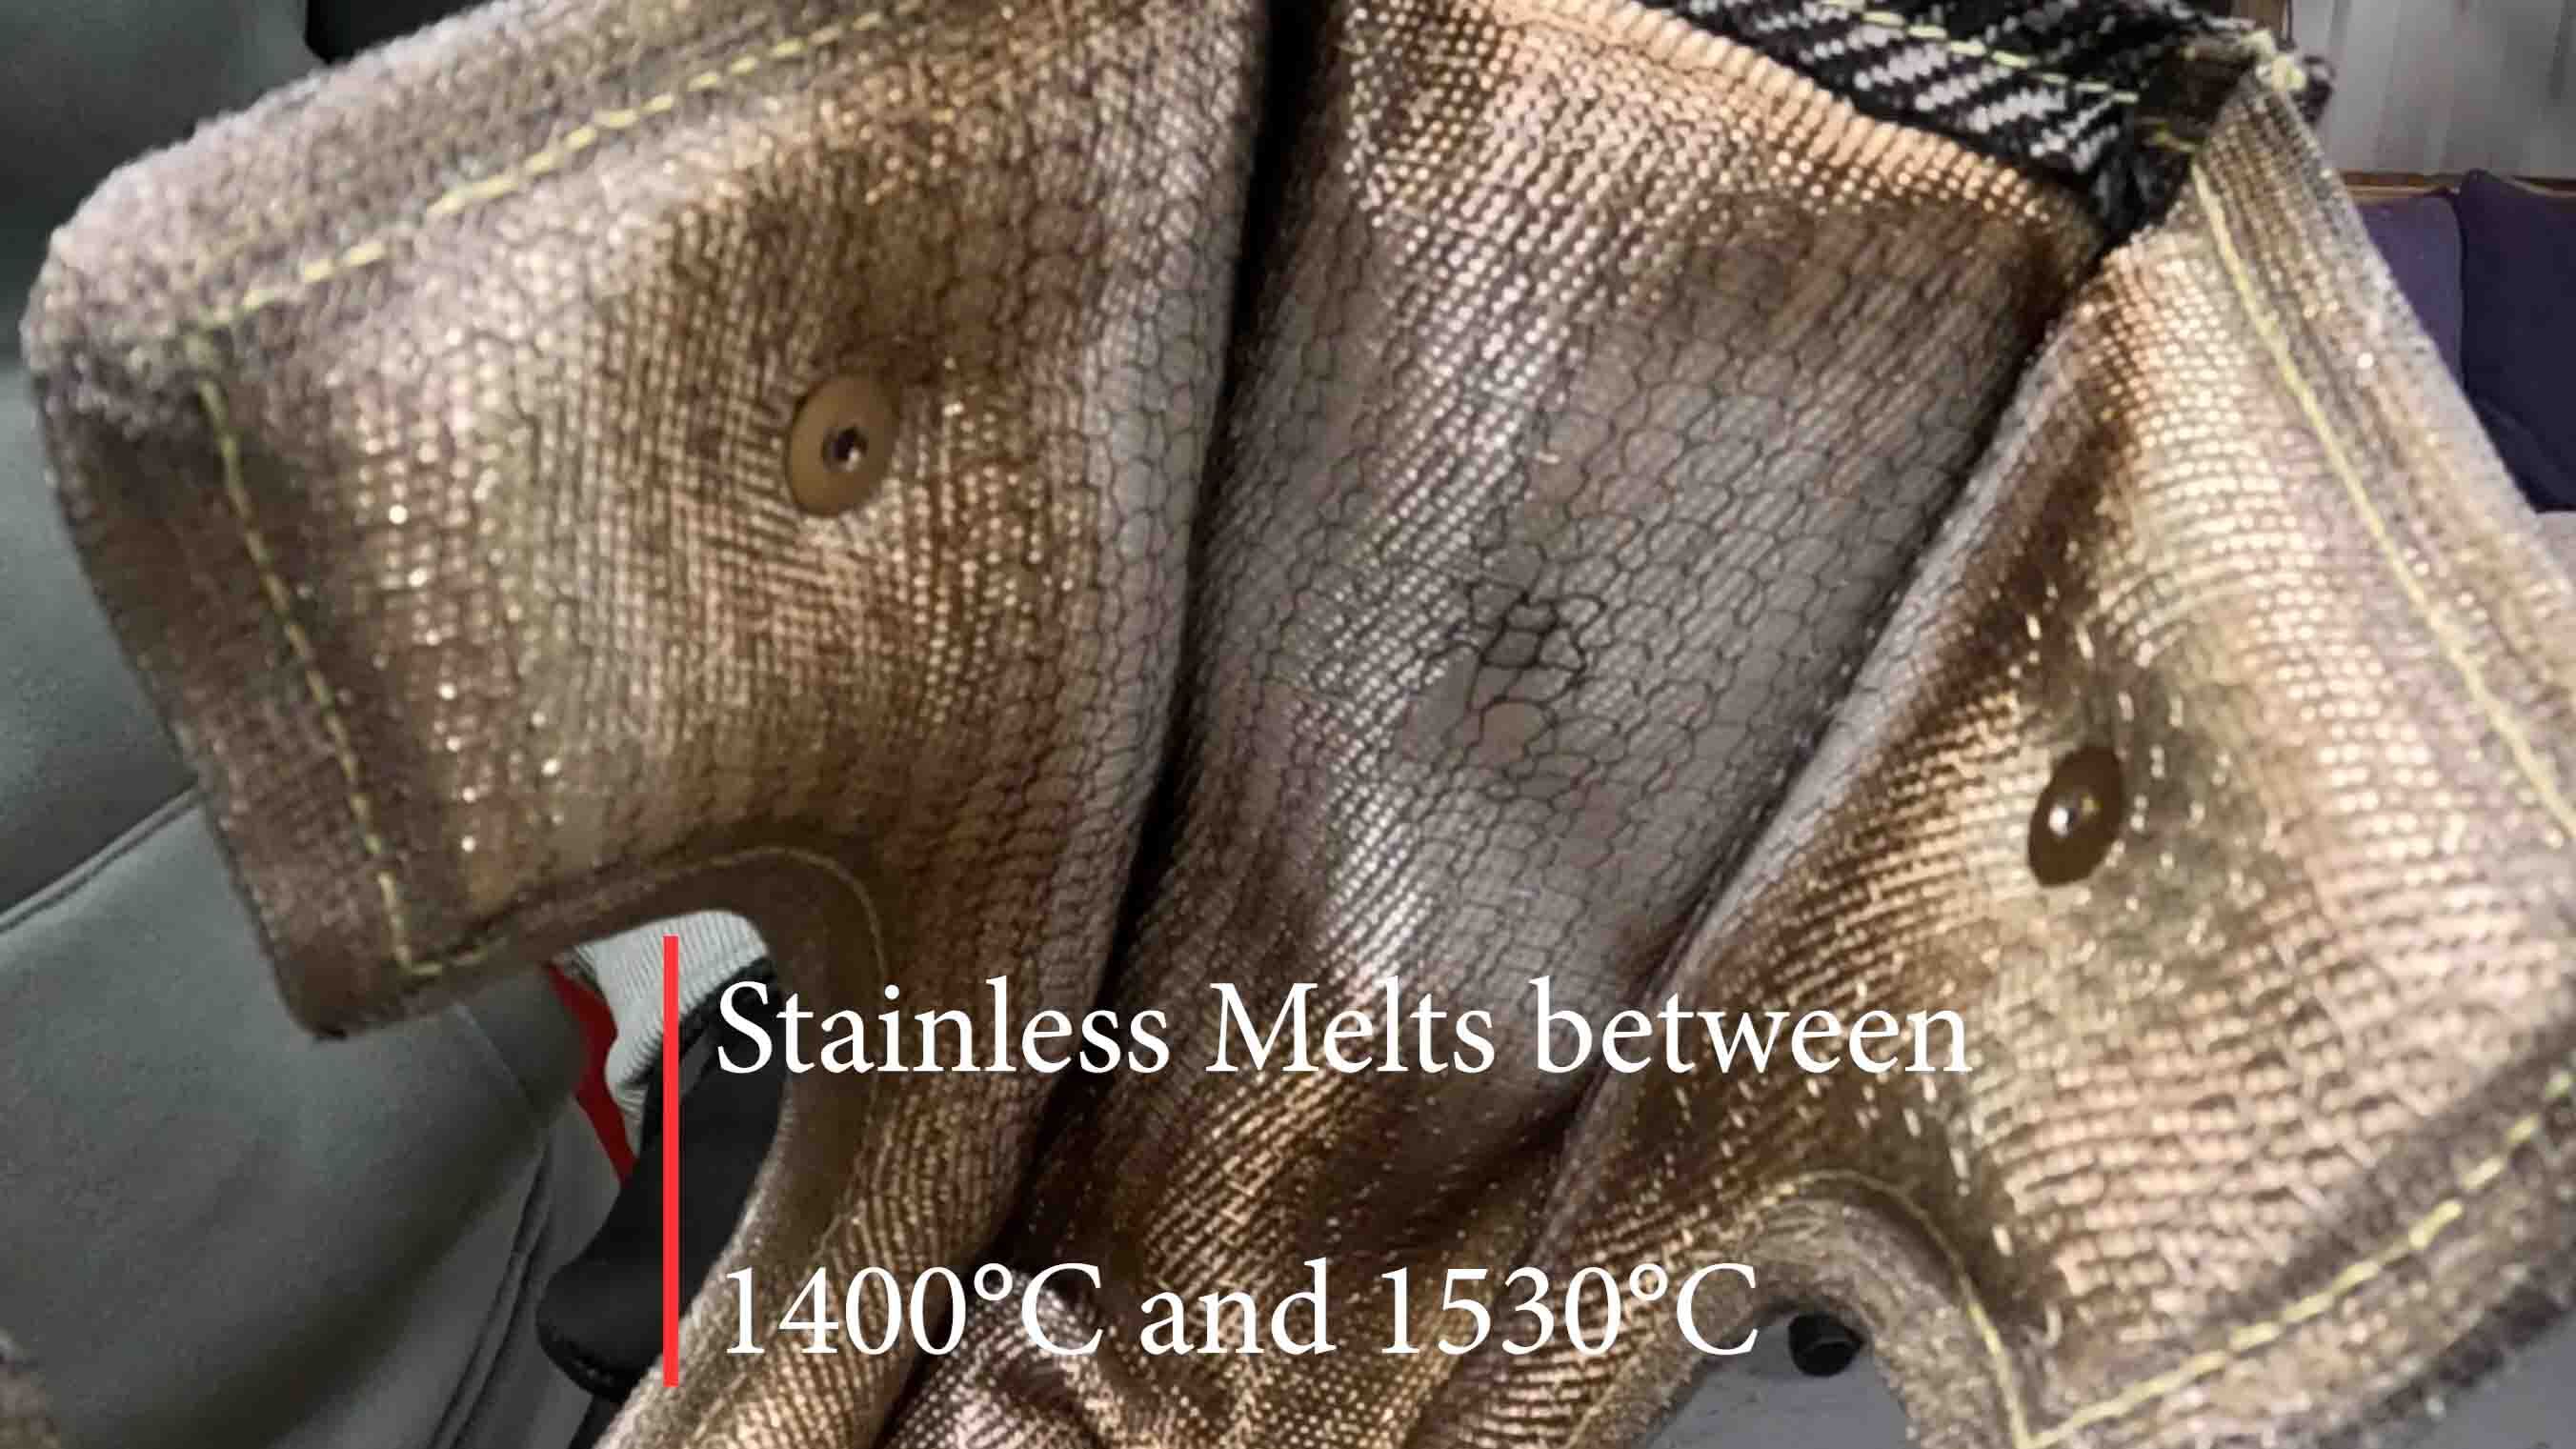
The inner mesh saw extreme local heat, but the blanket did not ignite or collapse during the test.
Watch: Extreme Thermal Test | Will A Blowtorch Destroy Our Turbo Blanket?
What this test means
The useful takeaway is simple: a correctly made turbo blanket can create a large thermal barrier between the turbo turbine housing and the rest of the engine bay. That matters when wiring, coolant hose, oil line, intake pipework, brake components, bonnet paint or plastic parts sit near the turbo area.
The limitation matters too. The result tells us that the blanket material and construction can resist direct heat in a controlled setup. It does not remove the need to fix oil leaks, check clearance, choose the correct size or recheck the blanket after heat cycles.
Test 2: Before and After Turbo Blanket Test on a 550bhp Audi RS4
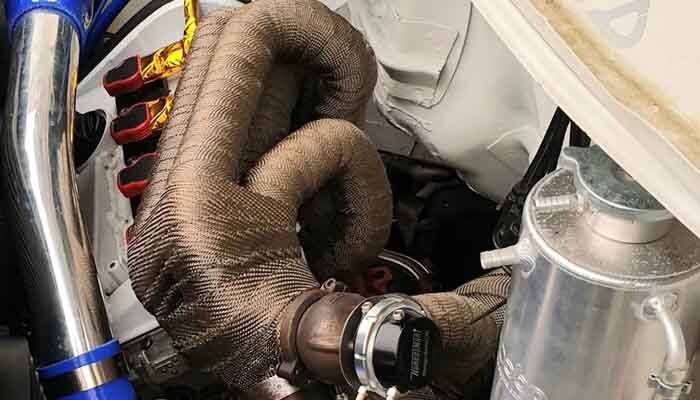
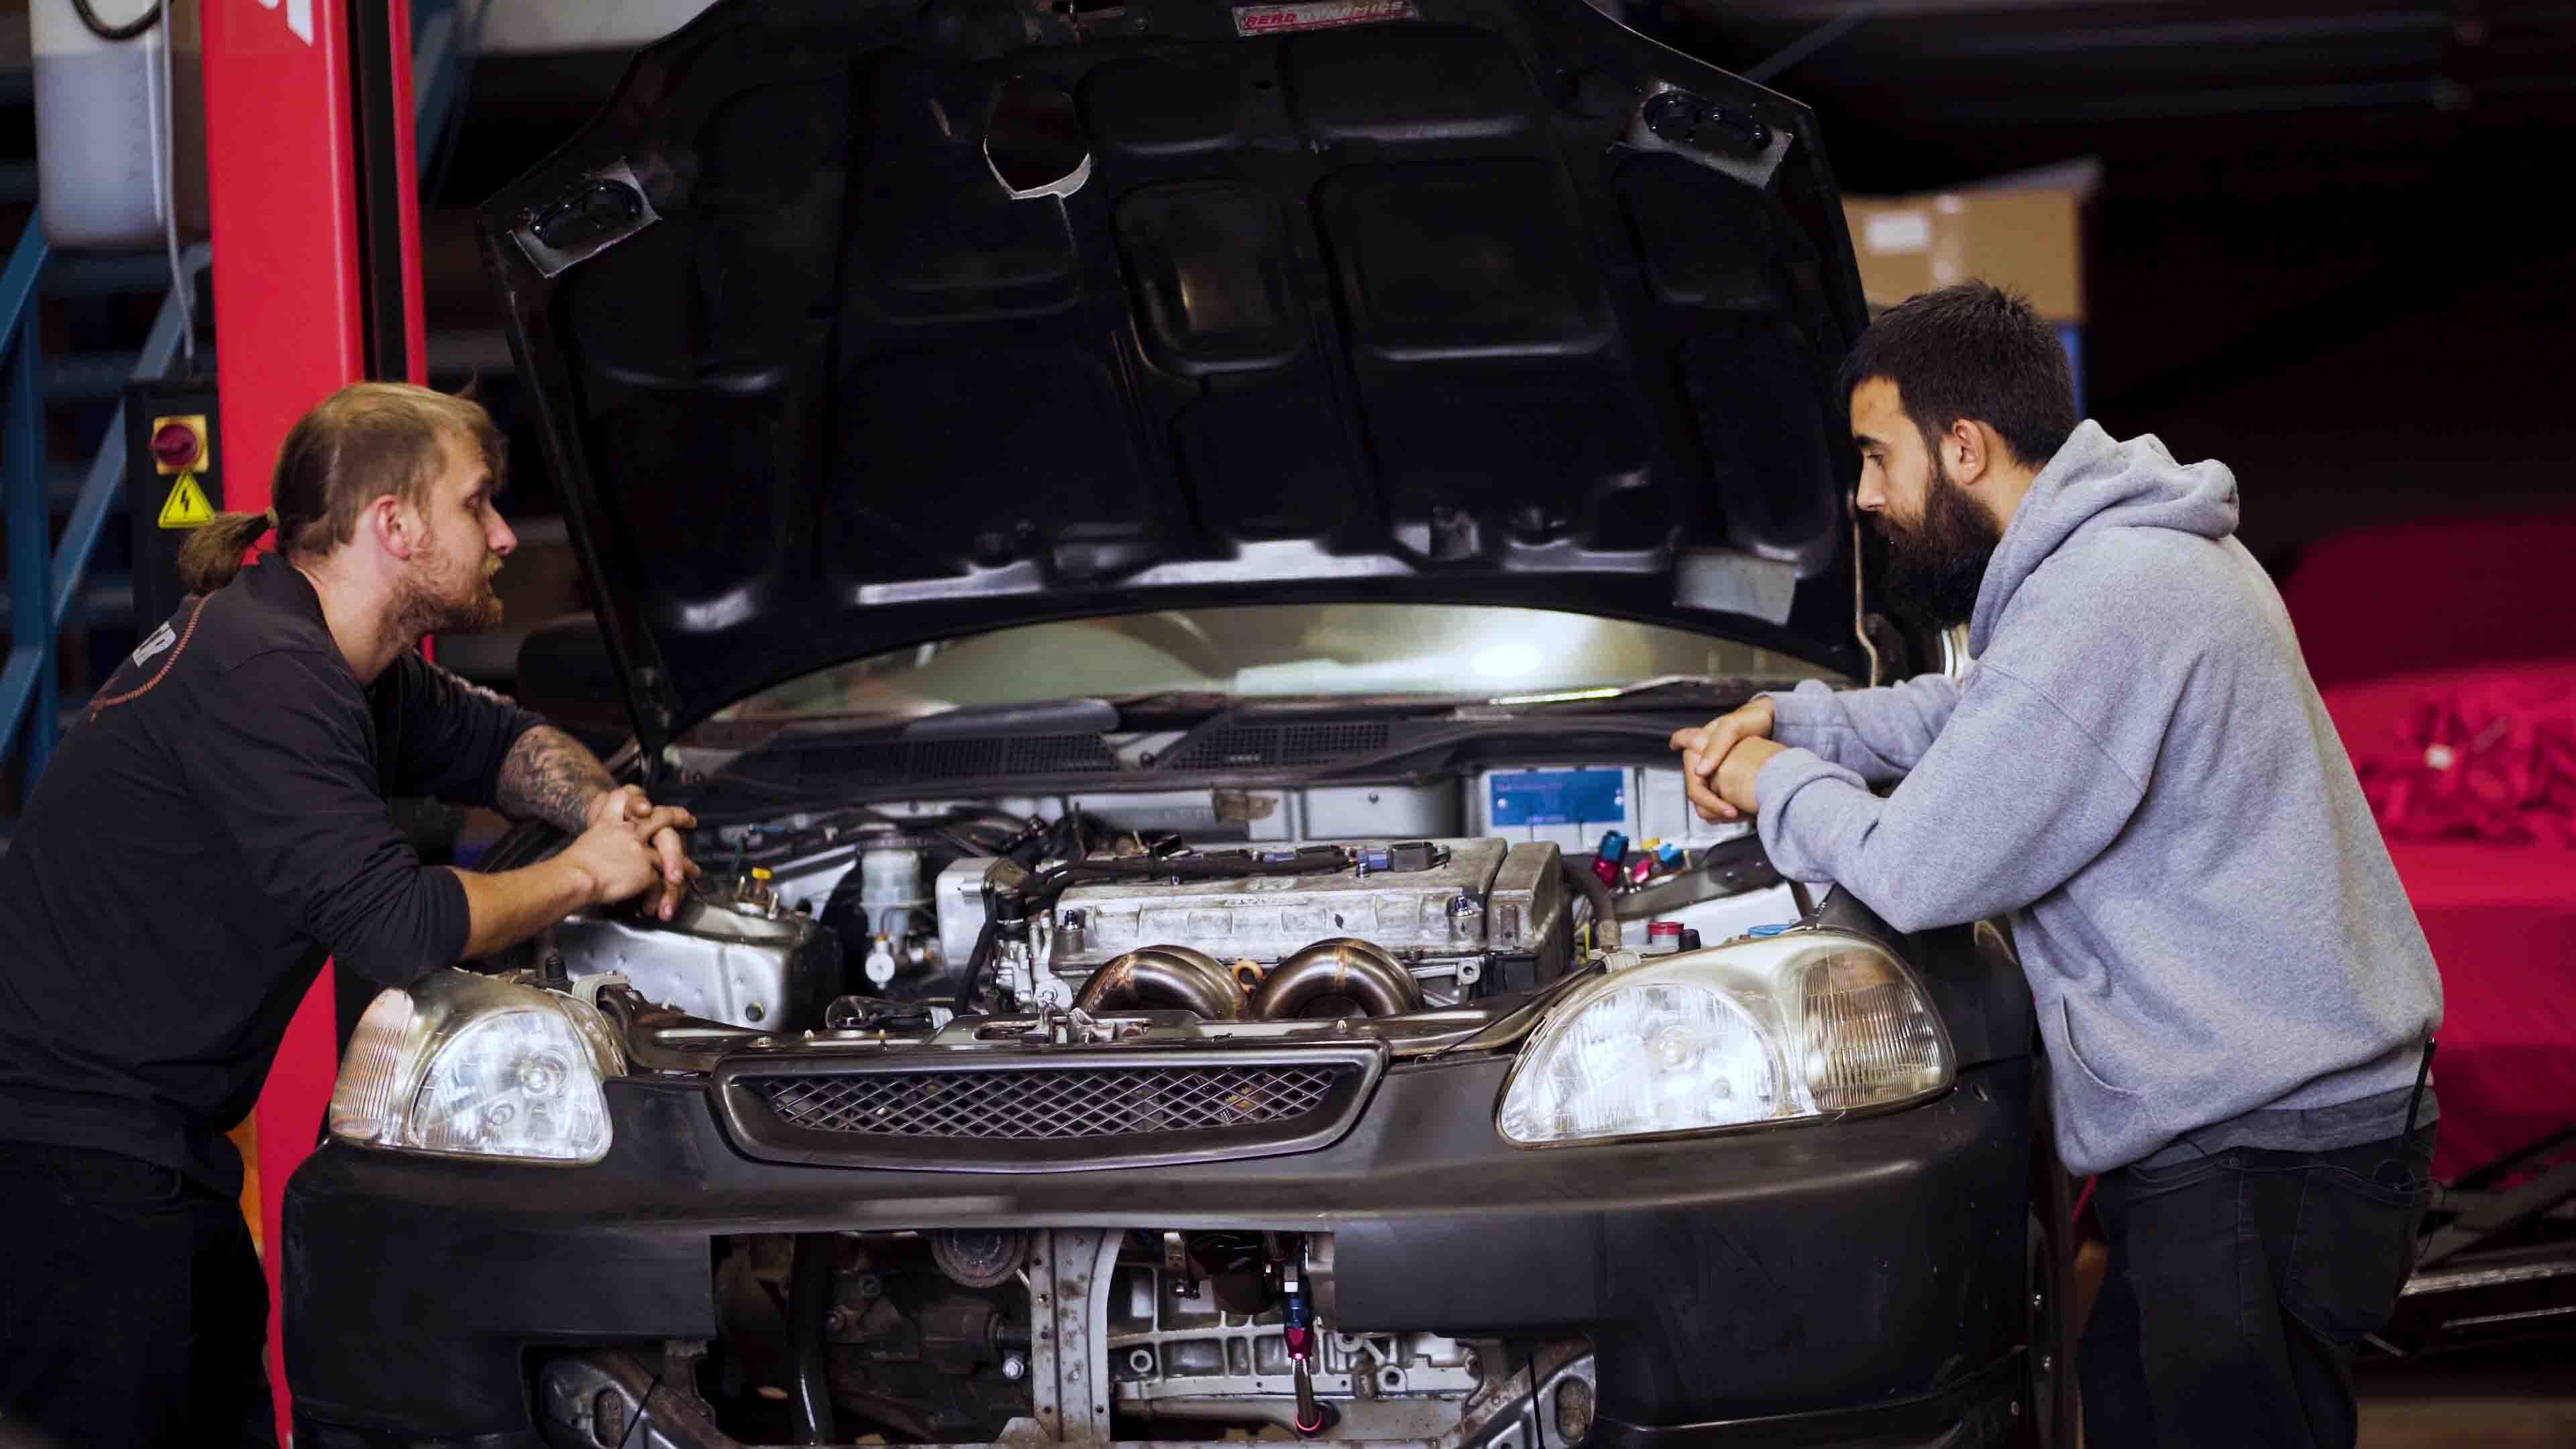
The Audi RS4 turbo blanket before-and-after test is the real-car proof piece. We fitted turbo blankets to Alex's 2022 Audi RS4 from HPWorx and measured the difference in key engine bay areas.
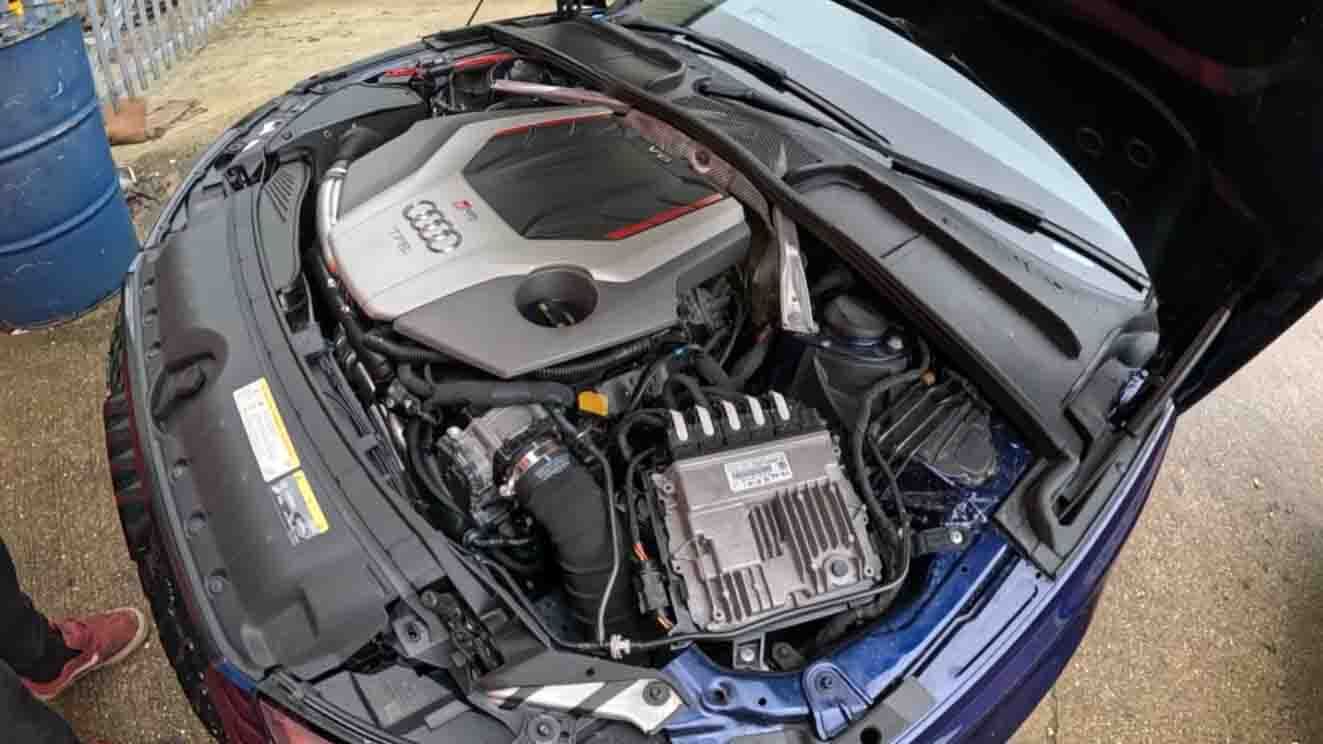
The RS4 hot-V layout makes this a useful real-car heat management test because the turbo area is tightly packaged under the bonnet.
On this 550bhp RS4, the measured turbo-area surface temperature dropped from 117.8°C to 70.0°C after fitting the blankets. The plastic engine cover dropped from 45.1°C to 25.5°C, and the aluminium shield above the turbo area dropped from 26.4°C to 10.5°C. Alex's intake air temperature logs showed an average drop of about 7°C, with the biggest reduction close to 10°C during the test.
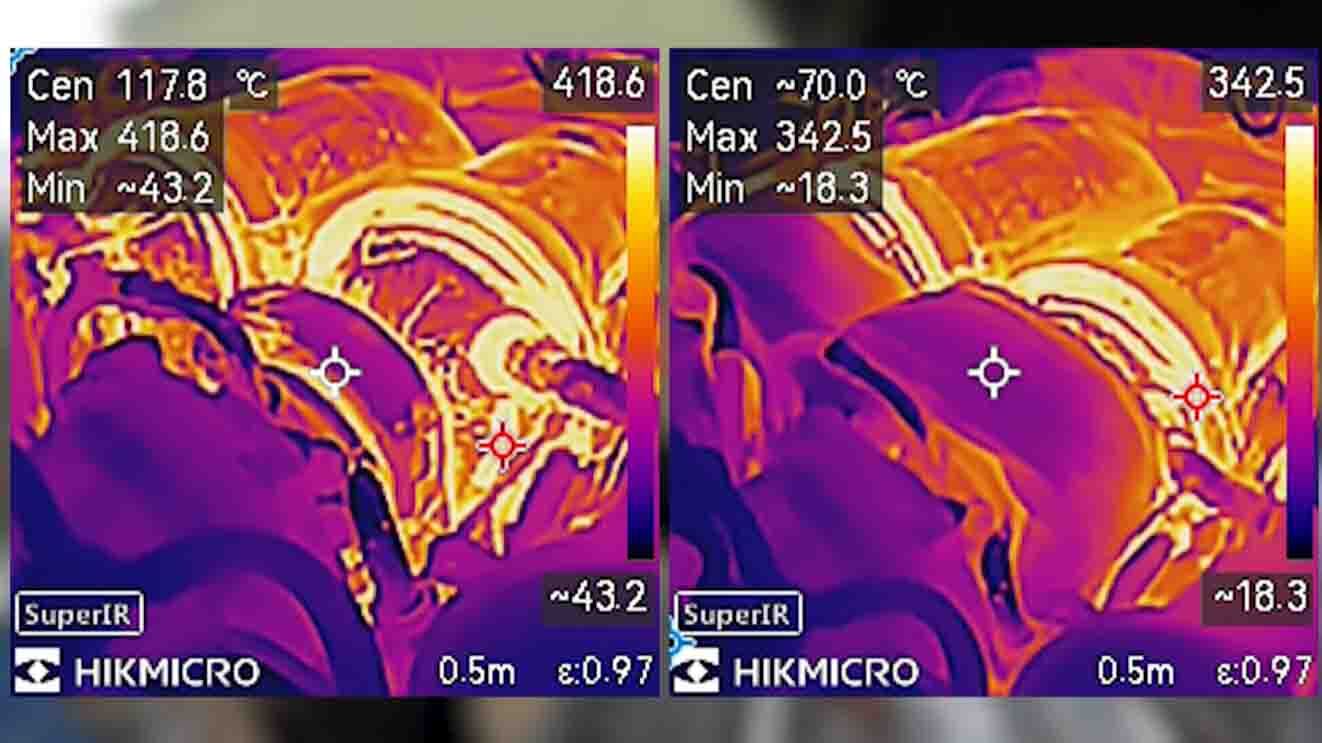
The thermal comparison shows the measured turbo-area surface dropping from 117.8°C to 70.0°C after fitting turbo blankets.
A 47.8°C drop at the measured point.
A 19.6°C drop, showing less heat soaking upwards into the engine bay.
A 15.9°C drop at the measured point above the turbo area.
The biggest reduction was close to 10°C during the test.
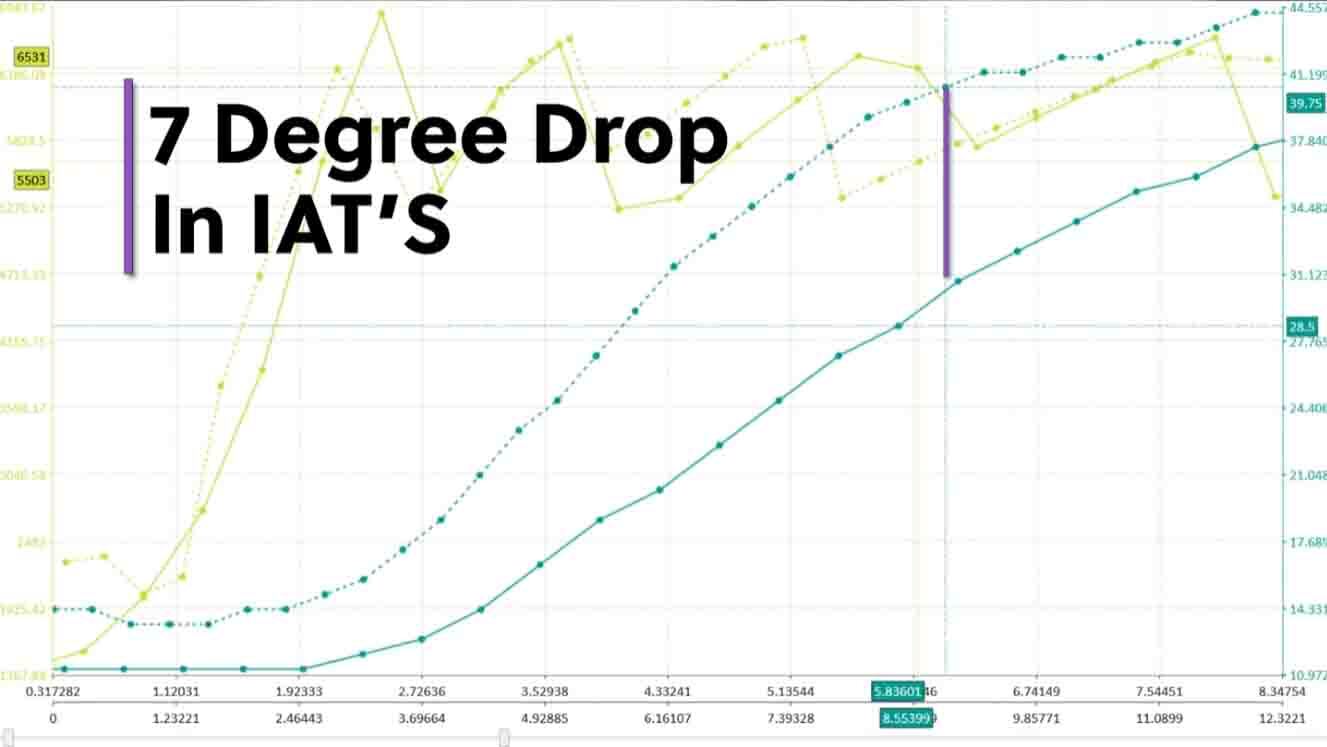
The intake air temperature log supported the surface temperature data, showing an average drop of about 7°C during the RS4 test.
Watch: Before and After Turbo Blanket Test on a 550BHP RS4
What this test means
This is the most useful type of heat management proof because it shows a complete car, not only a bench setup. The RS4's hot-V layout concentrates turbo heat in a tight area, so controlling the source heat made a measurable difference to several nearby points.
The honest limitation is that the result belongs to that car, that route, that setup and that test method. A different turbo layout, bonnet ventilation, ambient temperature, power level or installation can change the result. That is why we treat the RS4 data as proof that source control can work, not as a universal temperature guarantee.
How To Read Our Heat Management Tests
Heat management can be misleading if the result is separated from the method. A big number means very little unless you know where it was measured, what the starting point was, how long the test lasted and what changed between the before and after readings.
When we publish heat management data, read it in this order: heat source, vulnerable part, product used, test method, measured points, result, limitation and next action. That stops a turbo blanket result from being wrongly applied to exhaust wrap, or a reflective tape install from being treated as a direct-contact exhaust solution.
For the wider decision framework behind these tests, use our Contain, Reflect, Protect engine bay heat method. It explains when to control the source, when to reflect radiant heat and when to protect the vulnerable hose, line or wiring loom.
The source decides whether source control, shielding or component protection should come first.
Different parts need different products. A heat sleeve is for lines and wiring, not exhaust pipework.
Heat protection should not be used to hide oil leaks, damaged wiring or unsafe hose routing.
A bench test is controlled, but less like a car. A road test is realistic but harder to repeat perfectly.
What To Fit First Based On Testing
The right product depends on what is creating the heat and what is being damaged by it. Our tests support the same practical order we use when helping customers: identify the source, identify the vulnerable part, fix routing or damage, then choose the product that solves the actual problem.
Exhaust wrap belongs on manifolds, downpipes and hot pipework where the exhaust itself is the main heat source.
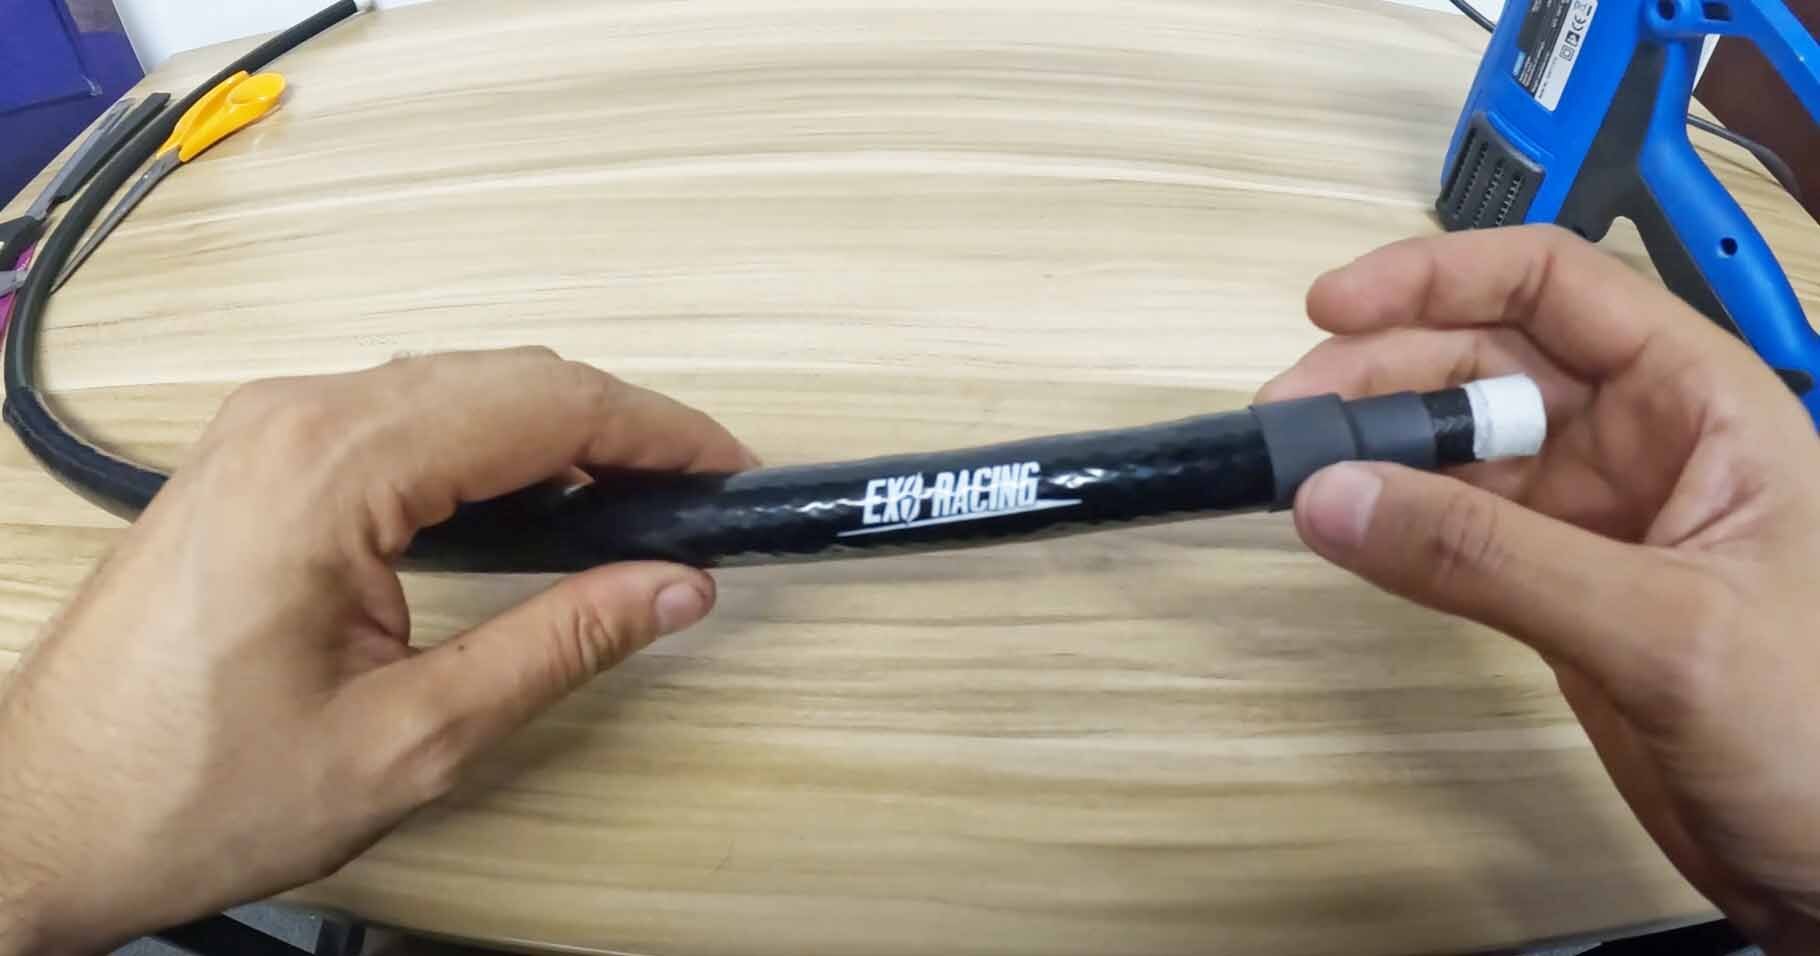
Heat sleeve is for protecting healthy hoses, lines and wiring after routing and clearance have been checked.
Check oil leaks, actuator movement, clearance and blanket size before fitting.
Do not use reflective tape or a heat sleeve directly on exhaust pipework.
Sleeve is protection for a healthy part, not a repair for damaged insulation, leaking hose or poor routing. If you have a split in a wire, a heat sleeve won't fix the broken wire.
Reflective material needs a clean, suitable surface and should not be used as an exhaust wrap.
If you are choosing a product now, start with the full Exoracing heat management range, then use the test sections above to match the product to the heat source and vulnerable component.
Common Mistakes When Using Heat Test Results
The biggest mistake is treating one heat management test as proof for every product and every car. A turbo blanket test does not prove an exhaust wrap result. A reflective tape video does not mean tape should be fitted to an exhaust manifold. A real-car before-and-after test shows what happened on that vehicle, not a guaranteed result for every setup.
We also see buyers trying to solve routing or repair problems with heat products. If a fuel hose is too close to a downpipe, the first question is not only which sleeve to fit. The first question is whether the hose can be moved, repaired, clipped away from the heat source or separated with a shield before protection is added.
Heat products work best when they are part of a proper fix. Control the source where possible, protect the vulnerable part where needed, and recheck the area after heat cycles. That recheck is especially important on turbo cars, track cars and tight engine bays with harsh engine mounts where vibration and repeated heat exposure can move parts or reveal clearance issues.
What Happens If You Ignore Heat Problems?
Ignoring heat usually costs more than fixing it properly. Nearby wiring can become brittle or melt, hose rubber can harden, fuel or oil lines can be damaged, reflective tape can lift if fitted to a dirty or unsuitable surface, and a turbo blanket can become unsafe if fitted over oil contamination instead of a clean turbo setup.
The correction is not always to buy the thickest material. Sometimes the right answer is to repair a leak, reroute a line, create an air gap, secure a loose part, fit a heat shield, or combine source control with component protection. This is why we show test methods and limitations rather than only product claims.

Reflective tape works best on clean, suitable surfaces facing radiant heat, not directly on exhaust pipework.
What We Are Testing Next
This page will become more useful as we add more measured heat management data. Our next updates will focus on the products customers ask us about most often, especially where real temperature data can make choosing the right fix easier.
Reflective tape testing will be most useful when it is tied to real installation quality, because surface prep, pressure and bends all affect the final result.
Heat sleeve testing will focus on the kind of hose and wiring protection customers actually fit in tight engine bays.
We will add the finished results to this page once each test has useful data, photos, limitations and a clear explanation of what the numbers do and do not prove.
Useful Supporting Guides
If you are using this test centre to choose or fit a product, these supporting guides help turn the data into the correct installation:
- Contain, Reflect, Protect: Engine Bay Heat Method for the overall decision.
- Turbo Blanket Size Guide: T25, T3 and T4 before ordering a blanket.
- How To Install A Turbo Blanket before fitting around the turbine housing.
- How To Install Silicone Fibreglass Heat Sleeve for hoses, lines and wiring.
- How To Install Heat Reflective Tape Without Peeling for clean surface preparation and fitment.
FAQs
What are the most important Exoracing heat management test results so far?
The two strongest measured tests are the turbo blanket blowtorch test and the 550bhp Audi RS4 before-and-after turbo blanket test. The blowtorch test showed a minimum measured difference of 534.5°C between the camera-limited hot side and the outside surface at one point. The RS4 test showed the measured turbo-area surface dropping from 117.8°C to 70.0°C after fitting turbo blankets under very harsh conditions within the hot V engine layout.
Do these heat management test results apply to every car?
No. They show what happened in our specific test conditions. A different car, route, ambient temperature, turbo layout, product fitment or airflow path can change the result. Use the data as proof of the product's role and the method, not as a guaranteed result for every setup.
We could even test an identical car and set up back-to-back, and chances are we will have slightly differing results due to hundreds of different factors at play, such as airflow, location, ignition timing, manifold design and clearance, etc.
Which heat management product should I choose first?
Start with the biggest and main heat source. Use a turbo blanket for the turbo turbine housing, exhaust wrap for manifolds and downpipes, heat sleeve for hoses, lines and wiring, and reflective tape or sheet for clean surfaces facing radiant heat. Fix leaks, damage and poor routing before fitting any heat protection.
Can I use reflective tape instead of exhaust wrap?
No. Reflective tape is for clean panels, intake parts, airboxes, bulkheads and other surfaces facing radiant heat. It is not an exhaust wrap and should not be fitted directly to manifolds, downpipes or exhaust pipework.
Can I put a heat sleeve over damaged wiring or a leaking hose?
No. Heat sleeve should protect a healthy hose, line or loom. Repair damage, fix leaks, clean contamination, and improve routing before adding a sleeve. Covering an unsafe part can hide the problem and make future inspection harder.
Will Exoracing add more tests to this page?
Yes. This page is designed to become the central home for all Exoracing heat management tests. As new measured heat sleeve, exhaust wrap, reflective tape, heat shield, turbo blanket and real-car tests are published, we will add them here with the method, data, limitations and next-step links.
Conclusion: Use Test Data To Choose The Right Fix
Heat management works best when you match the product to the actual problem. Our test data shows why controlling heat at the source can make a measurable difference, but it also shows why the method and limitations matter. A good result starts with diagnosis, not guesswork.
If your issue is turbo heat, start with the turbo blanket test data and size guide. If your issue is a line, hose or wire near heat, inspect and repair the part first, then look at the heat sleeve. If your issue is an intake, airbox or panel facing radiant heat, use reflective material on a clean, suitable surface. If your issue is exhaust pipework, look at the exhaust wrap and recheck after the first heat cycles.
View the Exoracing heat management rangeAbout the Author
Matt and the Exoracing team specialise in automotive heat management and performance parts for modified road cars, track cars, and high-power builds.
Exoracing uses product testing, installation experience and ongoing customer support questions to help you choose heat protection that suits the real heat source, vulnerable component and engine bay layout.